Thursday, September 29, 2011

Oatmeal Coconut Snack Cake

Last week, I wanted to make a cake my mother made for us when I was growing up.  She'd bake this cake until a toothpick came out clean and then carefully spread a mixture of butter/brown sugar/coconut on it before putting it under the broiler for just a couple of minutes.  After the frosting would start to 'bubble', she'd bring the cake out of the oven and put 1/2 large marshmallow on what will be 'a serving' of cake and broil it again just until the marshmallows turned a very light brown on top. 

Here it is and I'm going to nickname it my Memory Cake.  (For sure, you do NOT have to put the marshmallow halves on it-- I did it because.........................................my mother did it!   ♥)


My experience:  This cake was so well liked today that I quickly put 1/2 of it into the freezer so that portion wouldn't be quite so accessible.  (Freezing a 'goodie' doesn't always guarantee it a long 'life', though.

Cake Ingredients:
  • 1 cup quick or old-fashioned oats
  • 1 and 1/4 cup boiling water
  • 1/2 cup (1 stick) butter, softened
  • 1 cup brown sugar, packed (I've used either the LIGHT brown sugar OR the DARK BROWN sugar)
  • 1 cup white sugar.
  • 2 eggs
  • 1 teaspoon vanilla
  • 1 and 1/2 cup flour
  • 1 and 1/2 teaspoon baking soda
  • 1/2 teaspoon salt
Directions:
  1. Soak the oatmeal in the boiling water for at least 20 minutes.
  2. In a mixing bowl, whip together the butter and sugars.  
  3. Add the eggs and vanilla.  
  4. Then add the soaked oatmeal and mix thoroughly.  
  5. Lastly, add the flour, baking soda, and salt.
  6. Pour into a greased or 'sprayed' 9x13-inch baking pan.  Bake at 350 degrees for 30-35 minutes or until toothpick or clean sharp knife comes out clean.  (This cake will not rise as high as other cakes.)  Because I used a glass 9x13, I had the oven set at 330-degrees.)   Remove from oven and let cool for about 5-10 minutes; then spread evenly (and carefully) with coconut topping (recipe below).  
  7. Place the cake under the broiler for only 2-3 minutes or just until the topping is 'bubbling' and slightly golden brown.  Remove from the oven and place 1/2 (cut) large marshmallow on what will be 'each serving'.  Return to broiler for a just a tiny bit of time until the marshmallow halves turn a very LIGHT brown.  Watch these last steps SO carefully-- you do not want the coconut topping or the marshmallows to brown too much!
COCONUT BROWN SUGAR TOPPING RECIPE:
Ingredients:
  • 6 tablespoons butter, melted
  • 1 cup brown sugar, packed
  • 1 tsp. vanilla
  • 1/4 cup evaporated milk (you could substitute w/cream, half 'n half, 2% or whole milk).
  • 1 cup shredded coconut, packed.
Stir (or beat together) the first four ingredients listed directly above until the sugar is dissolved (beat it until you can't feel its grains in the container) and then add the coconut and mix together.  Spread on hot cake as directed above.

Enjoy, Enjoy, Enjoy, Enjoy, Enjoy! 

Wednesday, September 21, 2011

Easy, EASY Oven Stew


Ingredients and Directions:

Mix the following ingredients together in heavy pot (enameled cast iron cookware works great for this)...

1-2 lbs. cut up stew meat (or small chunks of cubed steak)
6 medium or large potatoes (Irregular-sized chunks work fine)
6 stalks celery, sliced into 1/2" pieces
6 carrots (I like to have them in irregular shapes/sizes)
1 med. onion (sliced pole to pole)


MORE INGREDIENTS:

Thoroughly combine the following and add to the above...

1 and 1/2 cups tomato juice (I like to use one sodium-reduced 12 oz. can of V-8)
1/2 cup water
3 teaspoons Lawry's seasoned salt
1 tablespoon sugar
3 tablespoon flour

Do not add more liquid unless you notice it needs more after the first hour. Cover tightly and bake at 325-degrees for about 2 hours or until everything is tender.  Sometimes, I bake it at 350-degrees for 1 hour, and then reduce heat to 300-degrees for 2 hours.  Whatever works with your oven and your schedule.

Monday, September 19, 2011

Sweet Pickle Relish

Photo by me, Doris

The camera's flash makes the relish look lighter than it really is.

The description for this recipe was "Best Sweet Pickle Relish Ever".   You can check out the original source for this recipe at:
I tried it............ to the tune of making 18 of 1/2 pint jars.  With that amount, I'm hoping it IS good!

Ingredients needed:

15-20 large over-grown cucumbers (well, not so big that they're turning yellow, though)
4 large green peppers
3 large red peppers  (I used green ones in place of these, too, making it 7 green peppers.)
5 large onions

Grind the above four together.  I used the grating blade on my Cuisinart food processor for this, but some of the seeds do slip through with that (they can be picked out later, if desired).  Heat and boil 10 minutes in 3 quarts of water.  To start out with, this requires a large, large kettle-- I used the canning kettle that I use for the hot water baths, stirring often to make sure nothing was sticking on the bottom.  (It cooks 'down' quite a lot, making us wonder why we started with such a big kettle.)

After boiling for 10 minutes, drain well.  What to drain this in?  That's what I wondered, too.  I used a sort of jersey type material that I 'clothespinned' around the edge of my large pressure canning kettle.  With no small children in the working vicinity, I carefully ladled the hot boiling mixture into that, held it up in the air until most of the liquid was out; then I took the 'load' of hot stuff and set in into my dish drain pan over the sink-- that way, it could drip away until it was dripped out.  : )    In the meanwhile,............................

In another large kettle, combine these ingredients:

5 cups white vinegar
2 tablespoons salt (pickling salt, or uniodized salt works best)
4 cups sugar
3/4 teaspoon celery seed
3/4 teaspoon ground cloves
1 teaspoon ground turmeric
4 teaspoons of mustard seed

Bring the above vinegar/sugar/spice mixture to a boil; add the drained mixture and return to boiling;  then turn heat way down, and cook all for 10 more minutes.

Fill sanitized canning jars and place hot lids/rings on them.  Process in a water bath canner or steam canner for 15 minutes (I processed these in my presssure cooker).

For the amount of ingredients I had, I ended up with 18 of 1/2 pint jars of relish (or, 9 pints).

Saturday, September 17, 2011

Broccoli Salad with Bacon 'n Cheese

I think the above salad is pretty much like the one Jennifer made for our Thanksgiving Day dinners-- it was a favorite then, and still is.

A variation of this salad is as follows:
This variation (pictured above) has one large cluster of red grapes added to it.  It sounded so weird to have grapes and broccoli together, but I saw it in the Home Cures That Work e-subscription that I have.  I gave it a try, and like it.   After all, some versions of this recipe call for raisins-- and they are dried grapes.  (When putting the grapes in, I LEFT the chopped onion OUT, but I kept everything else the same.)

Yield: 8 to 10 servings
Prep Time: 20 minutes

3 heads broccoli  (If you want it to appear more 'bright green' in your salad, drop the trimmed broccoli into boiling water for only 20 to 30-seconds and drain, cool quickly in ice water and drain well!)
4-6 slices bacon (as lean as possible), cooked and crumbled
8 ounces  cheddar cheese, cut into small cubes or small strips
1 small onion, very finely chopped 
~~~~~~~~~~~~~~
DRESSING MIXTURE:
1 cup mayonnaise
½ cup granulated sugar
3 tablespoons apple cider vinegar

         1. Trim the florets off of the broccoli, cutting large pieces into bite-size pieces,
              and rinse in a colander (drain thoroughly, or spin dry).
 
           2. Combine the broccoli, bacon, cheese and onion in a large mixing bowl.
3. In a medium bowl, whisk together the mayonnaise, sugar and vinegar(I stir this mixture with a spatula until I can't feel the little grains of sugar rubbing on the sides of the glass bowl.)   Pour the dressing over the broccoli mixture and stir until everything is evenly coated.  To get the extra dressing from the bottom of the bowl, stir again just before serving.
4. This broccoli salad can be served immediately, but it tastes even better if you cover it tightly and refrigerate it for an hour or two before serving. Some think that leftovers for the next day are even better

Monday, September 12, 2011

100% Whole Wheat Maple Bread (No Kneading!)

Both pictures in this blog were taken by me, Doris.


This recipe uses 100% whole wheat flour with maple syrup as the only sweetener.  I add neither salt nor oil/butter.  It doesn't end up being 'heavy' and I think it has a good taste to it.

The texture is quite a bit like that of banana, zucchini or pumpkin bread.

I usually triple the recipe because then I can use the 32-oz. size carton of plain yogurt (with just a little left over for me to have).  Actually, by using the whole container of yogurt, you should be able to 4x this recipe.

Healthy Recipe from Home Cures That Work:


Ingredients:
  • 1/3 cup milk
  • 1 cup plain yogurt ( My niece Judy E. said she would probably use the Vanilla flavored yogurt)
  • 1 egg, lightly beaten
  • 1/2 cup maple syrup
  • 1 lemon, juiced (I substituted 1 tablespoon lemon juice from a bottle) 
  • 2 cups whole wheat pastry flour  (I used regular 100% whole wheat flour, and it worked)
  • 2 teaspoons baking soda
  • 1/2 teaspoon ground cinnamon
  • 1/4 teaspoon ground nutmeg
  • 1/2 cup chopped nuts (optional)
Preparation:
1.     Preheat oven to 360 degrees F.
2.    Grease, OR generously spray with 'non-stick', a 9x5-inch bread/loaf pan.
3.    In a bowl, mix wet ingredients (milk, yogurt, egg, maple syrup, and lemon juice).
4.    In a separate bowl, mix dry ingredients (flour, baking soda, cinnamon, and nutmeg).
5.     Gradually stir the dry mixture into the wet mixture until moistened.
6.    Pour into the prepared loaf pan.
7.     Bake for 45 minutes, or until a knife inserted in the center comes out clean.
8.    Cut into 12 slices

Nutritional Facts: (One slice, if made as 'original' recipe designates)
Calories: 110, Total Fat: 1.2g, Sodium: 234mg, Dietary Fiber: 2g, Carbohydrates: 23g, Protein 4g.

Saturday, September 10, 2011

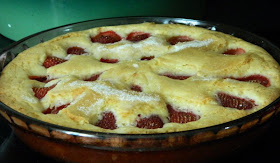
Pie Plate Strawberry Cake


I first saw this on Martha Stewart's show and I've made this quite a few times. You can go to the following website and see a photo of how it ends up looking:  http://www.marthastewart.com/336020/strawberry-cake *

*I put a few less strawberries on top because I like to use this recipe as the 'shortcake' part of Strawberry Shortcake by pouring a little 'strawberry sauce' over this.  To make it quite 'fancy', you can top with whipped cream or a small amount of ice cream. 

INGREDIENTS:

1 and 1/2 cups all-purpose flour
1 and 1/2 teaspoons baking powder
1/2 teaspoon salt
~~~~
6 tablespoons butter, softened, plus more for the pie plate
1 cup sugar plus an extra 2 tablespoons sugar for the top
1 large egg, slightly beaten
1/2 cup milk
1 teaspoon pure vanilla extract
~~~~
1/2 to 1 pound strawberries, hulled/halved and set aside.

DIRECTIONS:

1.  Preheat oven to 350-degrees.  Spray a 10-inch pie plate with non-stick spray and set aside.  Sift flour, baking powder and salt together into a medium bowl.  Set aside.

2.  Put butter and 1 cup sugar in the bowl of an electric mixer and mix on medium-high speed until pale and fluffy, about 3 minutes.  Reduce speed to medium-low; mix in egg, milk, and vanilla.

3.  Reduce speed to low, gradually mixing in flour mixture. Transfer batter to sprayed  pie plate.  Arrange strawberries on top of batter, with the cut sides downward in whatever design you want.  Sprinkle remaining 2 tablespoon sugar over berries and top of cake.

4.  Bake the cake  for just 10 minutes at 350-degrees.  Reduce oven temperature to 325-degrees.  Bake until cake is golden brown and firm to the touch, about 45 minutes longer (I tested its middle with a toothpick).  Let cool in pie plate on a wire rack.  Cut into wedges.  Cake can be stored in refrigerator OR at room temperature, loosely covered, for up to 2 days.


Monday, September 5, 2011

Bread and Butter Pickles (Mustard Seed Trivia)

This morning, I asked Wayne if he'd help me slice cucumbers.  Sure!   That made this whole process go more quickly.


First Ingredients:

24 cucumbers, about 4-5" x 1", cut into 1/8" thick slices
6 med. size onions, thinly sliced
2 green bell peppers, diced
3 cloves garlic, chopped
1/2 cup pickling salt

1.  In a large bowl, mix together the sliced cucumbers and onions, diced green bell pepers, minced garlic (from a jar) and salt.  Gently mix together well enough to disperse everything equally.  Allow to stand for about 3 hours.

2.  At 3 hours, start to prepare the pickling liquid as follows:

Combine the following ingredients in a large saucepan and bring to a boil (use a saucepan large enough to also hold the cucumber mixture once this liquid is ready/boiling):

Second Batch of Ingredients:

3 cups cider vinegar
5 cups white sugar
2 tablespoons whole mustard seed*
1 and 1/2 teaspoons celery seed
1/2 teaspoon whole cloves
1 tablespoon ground tumeric

3.  Immediately, once the liquid boils, remove from the heat while you quickly do the following:  Using a colander, drain the liquid from the cucumber mixture.  Rinse off excess salt by running cold water over cucumber mixture in the colander for about 10 seconds.  Let the rinse water also drain off.

4.  Stir this drained/rinsed cucumber mixture into the boiling vinegar mixture.  Remove from heat shortly before the combined mixtures return to a boil.  (We don't want to 'cook' the cucumbers and make them mushy.)

5.  Transfer all to sterile containers.  I mainly fill the jars with the 'solids' and then add enough juice to each jar to make things 'equal'-- I filled each jar to within 1" of the top.  Seal and chill in the refrigerator until serving.

6.  I ended up with about a cup more than 3 quart jars (depending on the size of the cucumbers you used, this could vary a little).

* I've always wondered about those MUSTARD SEEDS used in some recipes.  Are they only for flavor?  Are the good for us?  Are they.........?   When I did a Google search, I found they do have benefits-- you can check this out for yourself.  A mere 250,000+ websites popped up:  https://www.google.com/search?q=mustard+seeds+benefits&rls=com.microsoft:en-us:IE-SearchBox&ie=UTF-8&oe=UTF-8&sourceid=ie7&rlz=1I7GWYA

P.S.  If you have questions about something I didn't make clear, post it in the comment section.

Potato Salad (about 100 Servings)

I don't remember where I copied this recipe from, but... it's in my recipe box.  If you like the following flavors, this might work for you.  If not, use your own 'salad sauce' and just use the  list below to give you an idea on how much of the 'basics' is recommended for 100 servings.  My comments are in red print below.

INGREDIENTS:
  • 40 pounds potatoes
  • 5 cups finely chopped onion
  • 20 teaspoons salt
  • 2 and 1/2 teaspoon ground black pepper
  • 5 cups Italian Salad Dressing
  • 10 cups mayonnaise or salad dressing (like Miracle Whip)
  • 1 cups chopped celery
  • 3 dozen hard-cooked eggs, cut up
DIRECTIONS:
  1. Wash potatoes. 
  2. Heat water to boiling.  Add un-pared potatoes to boiling water.  Recently, while watching a program on Food Network, it was said that we will end up with a more evenly cooked potato if we start their cooking in COLD water and let them heat along with the water.
  3. Boil for 30-35 minutes OR until tender (not mushy!)
  4. Drain, cool and peel.
  5. Cut potatoes into small cubes (or slices, or ??) and combine in bowl with chopped onion.
  6. Sprinkle evenly with salt and pepper.
  7. Add Italian salad dressing and gently mix well.
  8. Cover, and refrigerate for at least 2 hours.
  9. JUST BEFORE SERVING, add salad dressing OR mayonnaise.  Toss until the potatoes are well coated.
  10. Stir in chopped celery and chopped eggs.
  11. Refrigerate promptly and KEEP cold.

Sunday, September 4, 2011

Wheat Bread (The recipe Ryan uses.)

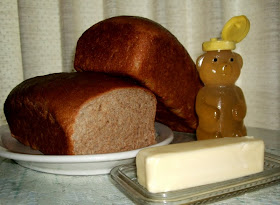
Ryan made bread from this recipe for us when Cheryl and I were visiting their family in Ritzville in the Fall of 2009.  It was sooooooooooooooooo good and I wanted the recipe.  I got it!  I did it!  Here it is.  It's a bread that does not take HOURS to make (and I don't miss the hand kneading part, either!)

This is a recipe for using 100% whole wheat flour-- and, the loaf doesn't end up feeling like a brick, either,   Yippee!!!!!!
The honey is from Rick's own beehives--  it's the best!!

The texture inside the loaf is good, too...
Other than my own two hands, and a larger version of Kitchen Aid mixer, I do not have a bread maker.  So,............ I use the Kitchen Aid.  I start with the mixer paddle, and then I switch to the dough hook when I start to add the last amounts of wheat flour.  (I coat the dough hook with oil before using it-- that helps a little to keep the dough from clinging to it.)

Mix these first four ingredients and mix only until the flour is wet:

2 and 1/2 cups hot tap water
1/4 cup honey (could substitute with 3 tbsp. sugar if you don't have honey)
2 and 1/2 cups whole wheat flour
1/3 cup vital wheat gluten flour (I used to buy this in Wal-Mart, but didn't see it lately; since, I've ordered some through Amazon.)

As long as the above mixture isn't TOO hot, yet, add the following and mix for only 15 seconds:

1 and 1/2 tablespoon yeast (this would be 4.5 teaspoons)

Add the next two ingredients and mix for 5 minutes:

1/3 cup oil (I used 1/3 cup butter and it worked great)
1 and 1/2 teaspoon salt

Now, continue adding flour (maybe 3 to 3.5 cups) until dough becomes elastic like, springs back and does not stick to the edges of the bowl.  "Knead" in mixer with dough hook for at least 6 minutes (or knead by hand for 10 minutes). 

Shape into loaves (or rolls) with oil on your hands.  I use my 9"x5" pans and I get two loaves from this recipe.  If using the 8" x 4" pans, you'd get three loaves. Place in warm oven (no warmer than 90-100 degrees) until double in size*;  then, set oven at 350-degrees and bake large pans for almost 35 minutes, or small pans for just 30 minutes.  Remove from pans and butter the tops.  Enjoy!

*To warm the oven for the bread rising, you can turn the oven on to the lowest setting for just a few minutes before the end of mixing everything.  Then, just before the final 'kneading' cycle, turn the oven off and it stays warm enough for the rising period. When putting the bread in to rise in that 'cozy/warm' oven, just leave the oven light on (it makes watching the pans/dough easier, and it gives off heat, too).

Note:  According to what Jennifer wrote when she sent the recipe to me, this is a slightly modified bread recipe adapted to make three of the smaller loaves from "The Amazing Wheat Book" by LeArta Moulton.