Saturday, December 29, 2018

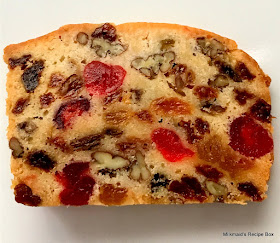
Nadine's Fruit Cake

Jokes are made about fruit cake-- 
how it makes for a good door stop, etc.
In my opinion, this fruit cake is 
nothing to joke about-- for sure, I will
never joke about it.  It's a real treat to/for 
me.  It's not a "cheap" cake to make, but, 
again, in my opinion, it is so worth 
whatever it costs to make it.
 My favorite FRUIT CAKE!!!, 
made by my sister Nadine!!!

Years ago, my sister Nadine got this recipe out of an issue of Farm Journal which many farmers subscribed to back them.  She makes this and shares with me.  It is my FAVORITE fruit cake.  I like it so much that I just cut off 1/4" slices at a time in order to make it last longer. 

Just lately, my daughter Cheryl made two variations of Fruit Cake-- both were very good, too.  She wants to try baking this recipe.  She WILL succeed, and I'm so happy about that!!!!!!!!!

Note:  This recipe has no Vanilla, no
other flavoring, and no spices in it.

Mix together, and beat vigorously with a spoon OR electric mixer for 2 minutes:  
1 cup cooking oil (such as Wesson oil, etc.)
l and 1/2 cups granulated sugar
4 eggs
Set aside for a little while.

 Sift together:
2 cups sifted flour
1 teaspoon baking powder
2 teaspoon salt

Stir this dry combination into the above oil/sugar/egg mixture, ALTERNATELY with the next two "combined" ingredients:

1 cup pineapple OR 1 cup apple juice
1 cup more sifted flour

Set aside this batter until the following fruits are combined.

````````````````````````````````````````````````````

Mix together:

1 cup thinly sliced citron (6 oz.)
1 cup candied pineapple (1-inch pieces) ... about 4 slices
2 cups whole candied cherries 
3 cups seedless white raisins (1 lb.)
2 cups nuts left in large pieces

Now, pour the  "set aside" BATTER at the top over this assortment of  combined/mixed fruit, stirring evenly and thoroughly.

Now:  Oil the empty pans, first.  Next, line the two "oiled" loaf pans, 8.5"long x 4.5" wide x 2.5"deep (measured from the open top). with "oiled" brown paper.  Yes, oil the lining paper very well, too. It will look "dark" when it is well oiled.  (You can use the brown paper from brown paper grocery bags to line the pans, but do not use any brown paper with printing on it.  Cut and bend another piece of brown paper to cover  the side/bottom/side; another piece to cover end/bottom/end.  You can let the oiled brown lining paper stick up higher than the pan by about 1/2".)

Pour thick batter into the prepared pans.  

Place a pan of water on the lowest oven rack.  

PRE-HEAT OVEN TO 275-degrees.

Bake cakes 2.5 to 3.0 hours in a very "slow oven" (275-degrees), on the middle rack. 

After baking, let cakes stand 15 minutes before lifting from pan while in the paper liner.  Cool on racks without removing the paper.  Carefully remove the oiled  brown paper liners after the cakes are almost cool.  

Store by wrapping tightly in aluminum foil (I prefer to wrap in something else ahead of the aluminum foil) and THEN add the foil to wrap tightly).  

Place in a covered jar (?) in a cool place to "ripen".  By storing it in the freezer, I can enjoy this fruit cake a year later and think it's freshly made.  

This recipe makes a combined total of 3.25 lbs. of fruit/nut cake(s).

The recipe won FIRST PLACE for a baker at the fair.  


Sunday, December 9, 2018

My FIRST Brownies

These days, with brownie mixes often being on sale, I don't know how many people make 'brownies from scratch', but...................... I couldn't resist putting this recipe on here.  It takes me way back to the late 60's when they were my only 'go to' and from my old Betty Crocker cookbook.  The 'addition' of the marshmallow layer and chocolate frosting came to me through Dolores S.  She'd make her brownies like this and treat us whenever there were R.S. doings or parties... she's a great cook/baker, period!

Ingredients:
  • 4 ounces of unsweetened chocolate
  • 2/3 cup shortening
  • 2 cups sugar
  • 4 eggs
  • 1 teaspoon vanilla
  • 1 and 1/4 cup all-purpose flour
  • 1 teaspoon baking powder
  • 1 teaspoon salt
  • 1/2 cup chopped nuts, optional

  • 2-3 cups miniature marshmallows, optional (spread on BAKED brownies)
 Directions:
  1. Heat oven to 350° 
  2. Grease 13x9x2-inch pan.  (If I'm after very 'neat-looking' cut brownies, I'll line the pan with foil-- one lengthwise piece going up and over each end for a 'grab tab', and another for the width and going up/over sides and grease its surface.)
  3. Melt shortening and chocolate over low heat, or in microwave.
  4. Mix in sugar, eggs and vanilla.
  5. Stir in remaining ingredients and mix only until flour is incorporated.
  6. Spread in prepared pan.
  7. Bake for 30 minutes, or until sides begins to pull away from pan.  Do not over-bake.
  8. Upon removal from the oven, turn oven off; scatter a layer of miniature marshmallows over hot top and put back into hot oven ONLY long enough for them to soften. 
  9. Remove from oven and spread marshmallows.  Let cool for an hour.
  10. Top the marshmallow layer with chocolate frosting (recipe follows)
Not that it's necessary by any means, but........in order to get clean/exact/sharp cuts for these brownies, I freeze them for a few hours and then remove the 'whole slab of brownies' to a wood cutting board.  While they are frozen, and with using a long/sharp knife, I can get the 'neat/sharp edges'. 

CHOCOLATE FROSTING Ingredients:
  • 1/2 stick (1/4 cup) butter, softened
  • 1/3 cup sifted Hershey's cocoa
  • 1 and 1/2 cups sifted powdered sugar
  • 2 tablespoons milk
  • 1/2 teaspoon vanilla extract.
Directions:
1.  Melt butter.  Stir in cocoa.
2.  Alternately add powdered sugar and milk, beating on med. speed until it is of spreading consistency.  Add more milk in very tiny quantities, if needed.  Stir in vanilla.  This makes about 1 cup of frosting, or just enough for a thin layer over the marshmallows.  If you like a thicker layer of frosting, double this recipe.

Wednesday, December 5, 2018

Raspberry "Surprises"

 Originally, this recipe was named Raspberry Treasures from http://www.tasteofhome.com/Recipes/Raspberry-Treasures Since I ended up changing things around, I call them my 'Surprises".  I guess because I'm surprised they turned out with how I made them.

INGREDIENTS:
  •  1/2 cup butter, softened
  • 1 package (3 ounces) cream cheese, softened
  • 2 tablespoons sugar (I decided to add this)
  • 1 teaspoon vanilla extract
  • 1 cup all-purpose flour
  • 1/8 teaspoon salt
  • ----------------------------------------------
  • 1/2 cup raspberry filling* (Recipe was tested using Solo brand filling-- see my note.)
  • ----------------------------------------------
  • 1 egg
  • 1 teaspoon water

HOW TO MAKE:
  • In mixing bowl, cream butter, cream cheese and sugar together.  Beat in vanilla. 
  • Combine flour and salt; add to creamed mixture. 
  • Divide dough in half; wrap each portion in plastic wrap and refrigerate for 1 hour or until easy to handle.
  • **On a lightly floured surface, roll out dough to 1/8-inch thickness.  Cut with a floured 3-inch round cookie cutter.  Place 1 teaspoon raspberry filling in the center of each.  Bring three edges together over filling, overlapping slightly (a small amount of filling with show); pinch edges gently.  In a small bowl, beat egg and water together until smooth; brush over dough.
  • Place 1-inch apart on ungreased or parchment paper-lined baking sheets.  Bake at 375-degrees for 10-12 minutes or until your oven has them a light golden brown.  Cool on pan for 1 minute before removing to wire racks.  Yield:  2 dozen if you make the tripod-shaped cookies.
*  I did NOT have raspberry 'filling' on hand, but I DID have raspberry preserves (jam).  Knowing the jam would run all over the place during baking, I did a search on how I could thicken this to work for me.  This is what I did:  I took 1/2 cup of the raspberry jam and added to it 1 tablespoon corn starch and then heated it until it thickened.  Cooled it on a plate for about an hour.  IT WORKED!!!!!!!!

** As you can see in the picture I posted with this recipe, I did not stick to the original way of making these.  I made just a few of the 'tripod' cookies (too much monkey work for me); then I put some raspberry filling between TWO solid rounds of the dough; after that, I put some filling on top of a solid round that was topped with a heart-cut-out round; and , finally, I spread filling on top of a rectangle of the dough and then rolled it up as I would a jelly roll and cut them into little slices.  It all worked, all taste the same-- some just look better!
 ▼ 

Tuesday, October 23, 2018

Banana Bread Snack Bars*


I was looking for a healthier kind of "early morning" snack-- something to get our little guy from 5:30 a.m. to 8 a.m. when he gets to school for his Monday-Friday breakfast.   I wanted something not toooooooo loaded with sugar.  First off, I hope you understand that he doesn't eat breakfast at school because of there not being a breakfast option right here at home--  it is because the school offers the breakfast program and students are encouraged to take part in it, so he does. 

My "google-search" took me to these Chocolate Chip Banana Bars--  BUT!, because I think they taste more like a slice of banana bread, that is what I am naming them.    (IF these were just for me, I'd load them up with nuts!  The way it is, I did change the original recipe just a bit--  the first time I made these, I used all coconut oil; this time I used butter as the shortening, and I added three tablespoons of ground flax seeds.)  

 Since our little one gives me a "thumbs up" on these, I am posting this recipe here so that I don't lose it.

INGREDIENTS: 


  • 5-6 very ripe bananas (1 and 2/3 cup mashed banana, total).  RIPE bananas add more        flavor and sweetness.
  • 3/4 cup brown sugar (I used dark)
  • 1/4 cup butter, melted  (OR 1/4 cup warmed coconut oil; OR 2 Tbsp warmed coconut oil/2 Tbsp applesauce; OR 1/4 cup all applesauce.)
  • 1/4 cup milk
  • 2 eggs, slightly beaten
  • 1 and 3/4 cup flour (or substitute with whole wheat flour if you don't mind these ending up a little "heavier")
  • 1 teaspoon baking soda
  • 1/2 teaspoon salt
  • 1 teaspoon cinnamon
  • 3 Tbsp. ground flax seed (optional)
  • 1 cup mini chocolate chips (put half in batter, spread other half on top just before baking).


DIRECTIONS:

  1. Heat oven to 350-degrees.  Spray a 15x10.5" pan with non-stick spray.
  2. Peel bananas and mash well.  Stir in brown sugar, oil, milk and eggs until combined.
  3. Add in dry ingredients and stir.  Stir in the ground flax seed (optional.  Fold in 1/2 of the             mini chocolate chips.
  4. Spread the batter into the prepared pan and sprinkle remaining chips on top.  Bake 18-              22 minutes, or until a wooden toothpick inserted in the center comes out clean
  5. Cool completely, and cut into squares.


*Adapted from a recipe from the recipes posted at butterwithasideofbread.com

Saturday, June 9, 2018

ANZAC Cookies (New Zealanders called them biscuits)

This cookie was popularized by WWI care packages to soldiers of the Australia New Zealand Army Corps (ANZAC), since they could be made without eggs, and they kept well on the overseas voyage to Europe.  The dough can seem very crumbly, but if you pack it firmly into balls (walnut sized), you'll have a good shaped cookie.

INGREDIENTS:

2 cups all-purpose flour
2 cups rolled quick oat
2 cups granulated sugar
1 cup flake coconut
1 cup (2 stick butter)
3 tablespoon white (or golden) Karo syrup
3/4 teaspoon baking soda
1/4 cup boiling (or VERY hot) water

1.  Preheat oven to 350-degree.  Line baking sheets with parcment paper (or aluminum foil, and set aside.

2.  In a small saucepan over medium heat

Sunday, June 3, 2018

Rhubarb Custard Squares*


Advance Preparation:
Gather and cut fresh rhubarb stalks into 1/3" slices-- enough to have 5 cups of cut rhubarb.  Set aside while preparing the next ingredients.


INGREDIENTS

2 cups all-purpose flour
1/4 cup sugar
1 cup cold butter


  • FILLING:
  • 2 cups sugar
  • 1/2 cup all-purpose flour
  • 1 cup heavy whipping cream (whole milk will work)
  • 3 large eggs, slightly beaten 
  • One pinch of salt

  • TOPPING (optional):
6 ounces cream cheese, softened
1/2 cup sugar
1/2 teaspoon vanilla extract
1 cup heavy whipping cream, whipped
```````````````````````````````````````````````````````````````````````````````````````````````

DIRECTIONS

In a bowl, combine the flour and sugar; cut in butter until the mixture resembles coarse crumbs. Lightly press into a greased 13x9-in. baking pan. Bake at 350° for 10 minutes.  (I put the flour, sugar and cold butter in the food processor and it's ready in about thirty seconds.)
    Meanwhile, as the crust bakes, start preparing the filling: Combine sugar and flour in a mixing bowl.  Beat in the cream and slightly beaten eggs until well combined.  Add a pinch of salt (optional).  Set aside.
    Spread the "set aside" sliced rhubarb in an even layer over the hot (baked) crust.
    Pour the beaten custard mix evenly over the layer of sliced rhubarb. Bake at 350° until custard is set, 40-45 minutes. Cool. 

    For the topping (optional), beat cream cheese, sugar and vanilla until smooth; fold in whipped cream. Spread over top. Cover and chill. Cut into bars.  Store in the refrigerator. Yield: 3 dozen.


"Test Kitchen Tips:


  • Heavy whipping cream gives custard fillings a luscious, decadent texture, but half-and-half cream or whole milk can be substituted with nice results.
  • This is a potluck hero: It makes a mountain of bars. If you're cooking for a smaller crew, however, just halve the recipe and use a 9- or 8-inch-square baking dish.
  • If you prefer your bars on the tart side, bump up the rhubarb to 6 or 6-1/2 cups or reduce the sugar in the filling to 1-1/2 cups. 
  • Go full garden party for your friends and family by adding the seeds of one vanilla bean or 1 teaspoon of rosewater to the filling. Both flavors pair beautifully with rhubarb and take these already fab bars to another level."
  • * Originally published as Rhubarb          Custard Bars in Taste of Home            April/May 1998, p27 
    "Once I tried these rich gooey bars, I just had to have the recipe so I could make them for my family and friends. The shortbread-like crust and rhubarb and custard layers inspire people to find rhubarb they can use to fix a batch for themselves. —Shari Roach, South Milwaukee, Wisconsin"

    Nutritional Information:  (Varies with using CREAM vs. Whole Milk)


    1 bar: 198 calories, 11g fat (7g saturated fat), 52mg cholesterol, 70mg sodium, 23g carbohydrate (16g sugars, 1g fiber), 2g protein.


    Loaded Cauliflower with Bacon

     INGREDIENTS:
    • 1 large head of Cauliflower cut into bite size pieces (approximately 6 cups)
    • 6-8 strips of bacon already cooked in oven for 20 minutes at 400-degrees, and crumbled.
    • 6 tablespoons chopped chives
    • 1/2 cup Hellman's Mayonnaise
    • 1/2 cup sour cream
    • 2 cups Colby Jack Cheese (may use Cheddar), divided into two portions
    • 8 oz. container of sliced mushrooms (optional)


    DIRECTIONS:
    1. In a large pot boil water and cook Cauliflower for 8-10 minutes, drain and let cool.
    2. Preheat oven to 425-degrees.
    3. In a large bowl combine sour cream, mayonnaise, 1/2 bacon (crumbled), 3 tablespoons of the chives, 1 cup of the cheese, mushrooms (optional), and cooked/cooled cauliflower.  Mix well.
    4. Place in lightly sprayed cooking dish and cover with remaining 1 cup of cheese, remaining crumbled bacon pieces.
    5. Bake for 20-25 minutes until cheese is melted.
    6. Top with remaining 3 tablespoon chopped chives and serve.

    Monday, March 26, 2018

    Potato Dinner Rolls

    I found this recipe in a folder I started adding to years ago.  This recipe looks so much like the one used by Jeanette-- I wonder if this was a handout from a church meeting a long time ago.  Maybe it was from her!  If so, that just means it will always be a winner.  Yes, a keeper!

    INGREDIENTS:
    • 1 tablespoon dry yeast
    • 1 teaspoon sugar
    • 1/2 cup additional sugar
    • 1 and 1/2 teaspoon salt
    • 1 cup mashed potatoes (no liquid added to them)
    • 2 and 1/2 cups potato water (from the boiling process)
    • 1/2 cup shortening
    • 2 eggs, beaten
    • 3 cups flour
    • 4 more cups of flour (about)
    DIRECTIONS:
    1. Dissolve yeast in bowl with the 1 tsp. sugar and set aside until frothy and bubbly.
    2. Mix together the 1/2 cup sugar, salt, mashed potatoes, potato water and shortening.  (This could be beaten with a hand mixer to blend well.)
    3. Add the 'rising' yeast mixture.
    4. Add first flour (3 cups).  Mix well.  Let this rest for about 5 minutes.
    5. Gradually, add the remaining amount of flour (not all at once).  Do not add more flour than recipe calls for.
    6. Put into greased bowl and turn to grease top.  Cover bowl and let rise until doubled. 
    7. Place 'doubled' dough on generously floured board.
    8. If necessary, sift a tiny bit of flour over the dough so it won't stick to your fingers.
    9. Now, you can break pieces off and shape into 'balls', or you can just cut off 'squares of dough' with a spatula and put them onto a greased or parchment paper-lined baking pan. 
    10. Let rise slightly.
    11. Bake 13-15 minutes in oven preheated to 350-degrees.

    Thursday, February 8, 2018

    "Should Be Illegal Oven BBQ Ribs" *


    What Beverly Carson wrote about this recipe back on April 1, 2001:  "After not being able to find restaurant ribs that satisfied my hot sweet appetite, I carefully attempted various combinations of flavors until I found one that I and my family thought was perfect.  Hope you enjoy them too."

    INGREDIENTS:

    3 lbs. pork back ribs (for after you get the following list of ingredients mixed together)...
    • 12 ounces barbecue sauce
    • 8 ounces of honey
    • 1 teaspoon paprika
    • 1 teaspoon chili powder
    • 1/2 teaspoon garlic powder
    • 2 tablespoons Old Bay Seasoning (I found it near the raw fish section of the store)
    • 1/2 teaspoon onion powder
    • 1/4 teaspoon celery salt
    • 1/2 cup dark brown sugar
    • 1/4 teaspoon freshly ground black pepper
    • 1 medium onion, grated OR very finely chopped
    • 1/4 cup white sugar
    DIRECTIONS:

    Except for the ribs, combine the above and mix for about a minute to make sure all is evenly blended.
    1. Cut strip of ribs apart for easier serving.  (Maybe with about three of the bone sections in each?)
    2. Lightly spray roasting pan with non-stick spray.
    3. With paper towel, dry the surface of the ribs and dip each into the above BBQ sauce mixture to coat.
    4. Place them into the roasting pan (single layer)-- bony side down.
    5. Pour remaining BBQ sauce mixture over the top.
    6. Cover lightly with foil.
    Bake at 375-degrees for approximately 1 hour.  Check occasionally to turn OR stir the sauce.  I prefer to cook them for a longer time (up to two hours at only 325-degrees).

    The cook who submitted this recipe said you can use a broiler for these ribs but you would have to watch them more closely and adjust cooking time.    ALSO, she said, these ribs are also great finished on the grill for a few minutes on each side.

    Sunday, February 4, 2018

    Springtime Skillet Dinner

    Here's another recipe from my old Betty Crocker's Picture Cook Book-- it is probably an edition from the late 1950's. In this book, above this recipe on page 276, there is this quote:

    "Mrs. Claude Stuart of Florin, California, originator of this dish, wrote: 'It takes less time than regular stew . . . and tastes much better."

    xxxxxxxxxxxxxxxxxxxxxxxxxxxxxxxxxxxxxxxxxxx


    What I am noticing about the recipes in this old cookbook is that they call for very common and well known ingredients!  Ingredients I don't have to ask about with, "HUH? WHAT is that? and ...  WHERE can I get it?"

    Brown in 2 tablespoons fat (butter) in 10" skillet . . .
         1 clove garlic, cut up (don't let it scorch or burn).

    Remove garlic.  

    Then, add to pan, cooking until browned while stirring . . .
         1 cup finely diced onion
         1/2 lb. lean ground beef

    Add . . .
         1/2 cup UNcooked rice
         5 to 6 cups water
    Simmer uncovered over low heat 40 minutes.

    Add . . . 
         1 cup finely diced carrots
         1 cup finely diced potatoes
    Continue simmering until tender (20 minutes?)

    Season with . . . 
         1 to 2 teaspoons soy sauce
         1 tablespoon salt (or less, if needed)
         1/8 teaspoon ground black pepper

    Serve hot . . . garnished with parsley.
    AMOUNT:  6 servings

    Tuesday, January 9, 2018

    Toasty Cheese Bake*

    We first made this in August of 1993....

    INGREDIENTS:

    • 16 slices white bread (or very light/fluffy wheat bread)
    • Butter
    • 1 pound lean ground beef
    • 1/2 cup chopped onion
    • 1/4 cup chopped celery
    • 2 Tbsp. prepared mustard
    • 1 teaspoon salt
    • 2 cups shredded cheddar cheese
    • 2 eggs, slightly beaten
    • 1 and 1/2 cups milk
    • 1 teaspoon salt
    • 1/4 teaspoon ground black pepper
    • 1/4 teaspoon dry mustard
    DIRECTIONS:

    1. Toast bread, butter both sides.  Set aside.
    2. Cook meat, onion, celery, prepared mustard and salt/pepper until meat is brown and the onion and celery is tender.  If there is visible fat in the pan, pour it off.
    3. Grease or spray 9x13" pan/dish. 
    4. Alternate layers of toast, meat mixture and cheese. 
    5. Pour mixture of eggs, milk and dry mustard over the top.  Bake uncovered for about 40 minutes at 350-degrees.

    *doubled this recipe which was contributed by Irene Zoromski and found in the Thorp Centennial Christian Women's Cookbook (1893 - 1993).  This is a thick 520 page recipe book and so full of  'GOOD'ness with recipes for cooking, baking, canning, freezing, pickling, jelly-making, etc. I found this book in 1993 through a write-up in our AGRI-VIEW farm paper-- it sounded like a winner at $15, so I ordered it through the mail, and I am glad that I did. 

    Friday, January 5, 2018

    Whole Wheat Cinnamon Bread

    INGREDIENTS:
    • 1 tablespoon dry yeast
    • 1 teaspoon sugar
    • 1/2 cup warm water
    • 1 tablespoon salt
    • 1/2 to 2/3 cup mashed potatoes (no liquid added to them)
    • 2 cups potato water ( lukewarm)
    • 3/4 cup maple syrup (may substitue 1/2 cup sugar, or 1/2 cup honey)
    • 3 tablespoons shortening
    • 2 cups whole wheat flour
    • 2 cups all-purpose white flour
    • About 4 and 1/2 cups additional all-purpose white flour
    DIRECTIONS:
    1. Dissolve yeast in 1/2 cup warm water and teaspoon of sugar.  Set aside until bubbly, frothy, and rising a bit.
    2. Place salt, mashed potatoes, potato water, maple syrup and shortening into mixing bowl. Beat together until well blended and smooth.  Mix at high speed for about 3 minutes.
    3. Add bubbly yeast mixture. Mix well. 
    4. Add wheat flour, and 2 cups white flour.  Mix well. Let this rest for about 5 minutes.
    5. Gradually, add more white flour by dumping 2 of the additional cups into the above mixture and let it mix together. 
    6. Put remainder of the 'additional' flour in a bowl where you will be working on the table and knead however much is needed into the dough.  There may be some of the remaining 'additional' flour left over, and that's okay.  Knead by hand for about five minutes.
    7. Place dough into greased bowl, turning to grease top.  Cover, and let rise until doubled (about 1 hour).
    8. Divide for making two loaves.  Cover and allow the dough to rest for about 15 minutes while greasing the two loaf pans.
    9. Roll dough balls out into a rectangular shape so that one edge is the length of your baking tin, and the other edge is longer. 
    10. Now, cover this rectangle with a mixture of cinnamon and a little bit of sugar (stay about an inch away from the long outside edge), and roll into a 'log' as you would do for a jelly roll.
    11. Seal edges by pinching together.  Place into greased pans, let rise for between 35-45 minutes or until about an inch over the top of the pans.
    12. Bake at 350-degrees for 40 minutes.