Saturday, December 31, 2011

Tortilla Rollup "Sandwiches"

These make up for a convenient (and, neat-to-eat) grab 'n go kind of replacement sandwich for while 'on the run', or 'going for a ride'.  This Summer, my daughter Paula got me started with making these, and she sent some with us for our trip from Utah to Portland, Oregon-- oh-h-h-h, so good!  Instead of using the regular white kind of tortillas, she buys these that are 100% whole wheat with just 1.5 g fat, 8 g fiber, with 5 g protein-- and are 9-10" across.  Each tortilla makes one large/long 'sandwich', or two 'small/shorters'.


INGREDIENTS:
  • Large flour tortillas
  • Cream cheese, whipped (or, mayonnaise, Miracle Whip, etc.)*  Lite versions work just fine!
  • Green lettuce and/or baby spinach leaves (I like 'em thick on mine!)  A thin/long slice of cucumber is great in these, too.  Pieces of green pepper?  Add what you like.
  • Deli ham slices (and/or, turkey, or beef, or chicken, or cheese, or  ???)
*Paula also introduced me to Beaver Brand Cranberry Mustard-- it's said to go great with turkey and other poultry meat.  But,...I like it with ham, also.

DIRECTIONS:
  1. Place tortillas on individual pieces of waxed paper, or Saran Wrap.
  2. Spread with the cream cheese, or salad spreads.
  3. Top with lettuce leaves, and meat/cheese of your choice.
  4. Roll up jelly roll-style.
  5. Wrap with the waxed paper/plastic wrap and keep chilled.
▼ 
If you wish to use these for something more 'fancy' than a wrap kind of sandwich, cut into 1/2" slices and serve on a plate lined with lettuce leaves.  Refrigerate left-overs promptly.

Friday, December 30, 2011

Jell-O Cloud (No cream, and no Cool Whip!)

Yippee!-- no whipping cream, and none of the 'unhealthy' Cool Whip in this one.  Instead, this recipe uses.........whipped evaporated milk with a tsp. of vanilla!
While evaporated milk, in its undiluted state, is somewhat comparable in calories to cream, it 'arrives' with about half the fat stuff, etc., and stays readily available in its can on the shelf.  (In my cupboard, the evaporated milk 'lives' cheek-to-cheek with the cans of canned pumpkin-- no big wonder about why that is!)

This 'Cloud' dessert is somewhere between a mousse and cheesecake. This recipe also has low-fat* and diabetic variations* that "are said to be" as good as the original.

INGREDIENTS:


  • 6 oz. box Jell-O ...OR two of the small 3 oz. boxes for a possible combination of flavors. (This time around, I combined two small boxes-- one lemon, one lime.  Some like this in orange, strawberry, etc.-- I think it's great in 'all lemon', also!)
  • 2 cups boiling water
  • 15 oz. can evaporated milk (chilled to 'cold')
  • 8 oz. package of cream cheese -- softened
  • 1 cup granulated sugar
  • 1 teaspoon vanilla  
DIRECTIONS:
  1. Dissolve Jell-O in boiling water. Place in refrigerator until it starts to thicken (I pour into 9x9" glass baking dish to speed up the 'chilling').
  2. Pour the can of evaporated milk into a medium/large mixing bowl, along with the beaters, and place in freezer to chill.
  3. When Jell-O begins to thicken (about the consistency of egg whites) and milk is chilled, proceed with recipe.
  4. In a small/medium mixing bowl, beat the cream cheese and sugar until the sugar loses it's 'grain'iness.  (With a food processor, you can start out with cold cream cheese and add the sugar; then the Jell-O, as stated in Step 5.  It works SO WELL for this).
  5. Add the thickened Jell-O to the cheese mixture and blend until well mixed, scraping down the sides often.
  6. In the chilled large mixing bowl, beat the well-chilled evaporated milk and vanilla and continue until stiff peaks form.
  7. Fold the Jell-O/cream cheese/sugar mixture into the beaten milk and beat at low speed until well blended, scraping the sides of the bowl often. Since the added ingredients might be light colored (depending on flavor of Jell-O you use), it can be hard to tell if the Jell-O is well distributed, so blend thoroughly.
  8. Spoon the 'Cloud' into footed (or any) dessert dishes and chill for several hours. (May also be poured into a chilled pie crust.) 
Below:  After being in the refrigerator for just an hour, it's already set up like this...
     

Thursday, December 29, 2011

Creamy Scalloped Potatoes (so easy!)

With this recipe, and by following the easy directions below, this has a white sauce that does not separate during baking...
I found this recipe in a magazine or paper(?) and have used it for over 35  years-- I've made it with 2½ lbs. potatoes, and have also 4X'd it and used 10 lbs.  Turns out the same every time, and it is so easy and economical.  The basics are potatoes, butter, flour, milk-- simple, huh!  (Additions are optional.)
 
TO MAKE THE WHITE SAUCE*:

Combine 3 tablespoons melted butter and 3 tablespoons flour in a heavy medium saucepan over medium heat.  Stir constantly.  After it heats and bubbles for just a little while, grab a whisk and now slowly add 2 ½ milk (while some cooks might like to 'fatten this up' by using cream here, I have found that it also works with 1% milk).  Blend well with the whisk until all is very smooooooth.  Now, abandon the whisk and stir constantly with a stiff kind of spatula or flat-edged non-stick kind of  'pancake turner',  scraping all areas of the bottom to make sure that nothing is sticking or scorching. Bring to a boil and continue cooking until it has boiled for at least two minutes in order for the flour to 'cook'.  Add 1 ½ teaspoons salt, 1/4 teaspoon black pepper, and stir.  Set aside.

*This white sauce is very 'basic' and can be used with whatever other kind of  food that might be baked/cooked like this.  Another use-- if you add just 1 additional tablespoon of butter and 1 additional tablespoon of flour to the same amount of milk, you have a great White Milk Gravy to pour over biscuits, chicken fried steak, or green/yellow beans, etc. (Again, stirring constantly over medium heat, be sure to let the hot sauce mixture bubble/boil for a minimum of two minutes, to 'cook the flour'.)
~~~~~~~~~~~~~~~~~~~~~~~~~~~~~~~~~~~~~

Wash, peel and thinly slice (or grate)  2 ½ pound of potatoes.   (Another option would be to use a 2 lb. bag of thawed hash browns if you need to save time.)

Combine the cooked white sauce and the grated potatoes by first putting a little bit of sauce into a sprayed/greased 3-quart casserole dish, then layering potato, sauce, potato,  sauce-- and cover.  Bake at 350-degrees, covered for 1 hour.  Using a fork, check for doneness after an hour. At this point, I usually remove cover, turn oven down to 325-degrees and bake for another 30 minutes.  (Total cooking time depends on the amount and depth of the potatoes, AND the size of the container you use-- pan, dish, roaster, etc.)

OPTIONAL:  To this recipe, you could add minced onion, chopped ham, or ???   For what I made today (in these photos), I added some bits of ham, and a couple slices of a small red onion. 

Some cooks might like to add a can of cream of celery soup (but, I don't like the MSG and high sodium that's in it) along with a couple of extra potatoes, snipped green onions, minced celery, and also top with cheese for the last 15 minutes of baking, etc., but I think this recipe can carry itself even without those additions.  At certain times, when I've wanted an even CREAMIER scalloped potato dish, I have 1½'d  the recipe for the white sauce and left the amount of potatoes the same.  Experiment and have fun with this recipe.  I have.
Additional note:  Although I have never made it yet, another scalloped potatoes recipe that looks so good, so great (while possibly being more expensive, fattening and time consuming to make) comes from someone whose food blogging I really, really enjoy.  It's Pennsylvania's Browneyed Baker and her recipe for this can be found at http://www.browneyedbaker.com/2011/04/20/scalloped-potatoes-recipe/ .  She writes that this was one of her 10 most popular blogging recipes in 2011.

Wednesday, December 28, 2011

Crunchy Cauliflower/Pea Salad

A few days ago, I bought a head of cauliflower and a bunch of broccoli.  I used the broccoli since then, but the cauliflower was still sitting on the refrigerator shelf and glaring  pleading, "What about Me-e-e-e!?!?" I could think of several things to make with it, then went with something that took the least amount of preparation time, and didn't need baking.  Result?  This salad.  With so much being said about eating a variety of 'good for us foods', this one has quite a combination!  I think you could experiment quite a bit with this, putting in or leaving out things to suit your preference.

INGREDIENTS:
  • 1 head cauliflower, rinsed, trimmed and cut into small florets
  • 3/4 cup mayonnaise (regular, or lite)
  • 1/4 cup Miracle Whip salad dressing (regular, or lite)
  • 1 tablespoon Dijon mustard OR regular yellow mustard for a bit less bite.
  • 1 teaspoon salt
  • Ground black pepper to taste
  • 3 hard-boiled eggs, chopped
  • 1/2 onion, finely chopped
  • 2 stalks of celery, finely chopped
  • 3/4 cup frozen small green peas, thawed, but not cooked
  • 1/4 cup dill pickles, finely chopped (1/4" pieces)
  • 3 slices crisply cooked and crumbled bacon, (optional)  Use turkey bacon for less fat.
  • 1/4 to 1/3 cup small cubes of cheddar cheese (optional)
DIRECTIONS:

  1. Rinse and trim cauliflower head, then divide florets into 'bite-sized' clumps.  Place cauliflower in a large saucepan and cover with water.  Bring to a boil and cook until just barely fork tender, about 7-8 minutes(?).  Drain and rinse with cold water to stop cooking process.  Cool slightly.
  2. Boil eggs, then cool.
  3. In a large bowl, whisk together mayonnaise, Miracle Whip salad dressing, mustard, salt, and pepper. 
  4. Add the boiled/chopped eggs, onion, peas, dill pickles, bacon pieces (optional), and/or cubed cheese (optional).  Blend well.
  5. Add the cooked cauliflower florets, and stir gently until they are coated well.
  6. Cover and refrigerate for 2 to 24 hours.  The longer the cauliflower salad chills, the better the flavors mix/blend.

FoodSaver Appliance (Gadget?)

This post is about something I've come to appreciate using for more things than just 'the usual'.  Thank you, PJ, it's yours, but I sure do like using it!  I'm referring to a FoodSaver.  By using it the way I do, my 'family of two' can easily and conveniently have a variety of food without eating 'one thing' over and over until it's gone.  I can save money when buying the bags for the FoodSaver it if I get the kind that's labeled "SimplySmart Universal Vacuum Sealer Bags".  (On the cover of their box, they list five different brands of vacuum sealers they'll work with.)  This brand of bags might be sold all around(?), but I bought mine at Fleet Farm.

Upon PJ's suggestion, which I greatly appreciate, I can make a large pan/dish of food and we can first enjoy it fresh from the oven...

Then, tightly cover the left-over portion and refrigerate it for 10-12 hours, or until it firms up.  After that, cut it into squares (as seen below) and put the 'blocks' into little plastic containers like this...
Snap their covers on, stick 'em into the freezer for about 10-12 hours.   Once frozen through, I get them out, pop 'em out of their little plastic containers and stick the frozen squares into a FoodSaver quart-sized bag-- 'suck the breath' out, label/date (as seen below), and put them back into the freezer.  Handled this way, they really do taste 'fresh' for at least three months,-- or, more?   (See my note at the bottom about foods that, individually, do not freeze well.*)
Above:  I do not put the 'name/date' on the place that is provided for it on the bags.  Instead, I write on the tab that will be cut off/discarded when opening/using the food.  This way, again concentrating on being a bit 'thrifty', I end up with a vacuum seal bag that can be thoroughly cleaned and re-used for something smaller the next time around (small block of cheese, or ???).

Another use:  I found that I can freeze some FRESHLY BAKED MONSTER COOKIES in single layers, get them out of the freezer, vacuum seal them in a gallon-size bag, and send them to the West-- when I follow these steps,** and use some sort of packing material, the cookies arrive in 'great shape'. (When sealing those frozen cookies, I double-deck them with their backs together.) 

And, another:  FoodSavers are good for prolonging the life of many things-- I'm sure you have a list longer than I do!  As I've done in the past, I vacuum packed a couple of blocks of dipping chocolate that are so readily available at this time of the year-- also, a few of the large Hershey bars that I use for a certain recipe, etc.

And, another:  Recently a family of two moved from out-of-State.  Knowing they would be living in a 'sea of boxes' for a little while, I took a number (and variety) of vacuum sealed 'food blocks' to them.  They said they really appreciated being able to have a home-cooked meal with that kind of convenience. 

I think the list of possible uses for a vacuum sealer is almost.............. endless!
 
So,...INhale!, Mr. FoodSaver,...IlikeYOU!!!!

*Note about foods that don't freeze as well:  While I've found that foods combined in a casserole seem to freeze well and taste fresh when thawed, there are foods that don't 'do well' on their own.  If you want to check out a site or two on this subject, click on...
http://lancaster.unl.edu/food/ciq-foods_that_do_not_freeze_well.htm
OR
http://nchfp.uga.edu/how/freeze/dont_freeze_foods.html
OR
http://www.ext.nodak.edu/extnews/askext/freezing/4451.htm
There are more sites, but you should get a pretty good idea of what to expect when  freezing certain foods from this information.

**When I did not freeze the cookies first, they sort of crumbled as the air was being sucked out.  Not a good thing!  Even on the 'manual' setting, it wasn't a good experience for the cookies!  This 'vacuum sealing method' of sending cookies may not work with 'delicate' varieties, but,...................m-a-y-b-e.................. it would........if they were first frozen and then quickly sealed. (???)

Tuesday, December 27, 2011

SUBSTITUTIONS


It seems there is a 'substitution of sorts' for everything I can think of!  A most extensive list can be found at http://www.joyofbaking.com/ and they issue this quote:  "Sometimes you may find it necessary to substitute one ingredient for another in a recipe. But using a different ingredient may change both the taste and texture of your baking, so it is a good idea before substituting to understand the role that ingredient plays in the recipe.  Use this table as a guideline only."  Their list for making substitutions can be found at:  http://www.joyofbaking.com/IngredientSubstitution.html

*For some of the more common substitutions, I have used the list below which was taken off of a paper pasted inside the cupboard door a long while ago (before I had the convenience of doing Internet searches).  In particular, I've gone to a shorter chart like this to find substitutions for the alcoholic beverages called for in some recipes. 

*On the subject of making a substitution for coffee in recipes, though, the best information I came up with agreed that there is no good substitute for it in recipes-- either you use it, or you don't.  BUT!, almost all contributing readers say that if you DO NOT HAVE/USE coffee, and you want to make up a certain recipe that calls for it, you MUST add the same amount of water as was called for if using brewed coffee, or your baked item will be too dry (So,... I guess that means the only 'sort of ' substitute for using coffee would be an equal amount of WATER!)   Often, they say, the coffee is called for in certain recipes, not to add a coffee flavor or caffeine, but to enhance the taste of the chocolate used in the recipe-- so, some say, to the water you use in place of the coffee, you could stir into it about a teaspoon or so of extra cocoa.  (???)

·    1 Tablespoon cornstarch (for thickening) equals: 2 tablespoons of all purpose flour
·    1/2 cup brown sugar equals: 2 T. molasses added to 1/2 cup granulated sugar
·    1 teaspoon baking powder equals: 1/2 teaspoon cream of tartar plus 1/4 teaspoon baking soda.
·    1 cup sugar equals: 1 cup packed brown sugar, or 2 cups sifted powdered sugar
·    1 cup molasses equals: 1 cup honey
·    1 square (1 ounce) unsweetened chocolate equals: 3 tablespoons unsweetened cocoa powder plus 1 tablespoon shortening or cooking oil, or one 1-ounce envelope pre-melted unsweetened chocolate product.
·    6 squares (6 ounces) semi-sweet chocolate equals: one chocolate 6-ounce package semi sweet chocolate pieces, or 6 tablespoons unsweetened cocoa powder plus 1/4 cup sugar and 1/4 cup shortening.
·    1 cup whole milk equals: 1/2 cup evaporated milk plus 1/2 cup water, or 1 cup water plus 1/3 cup nonfat dry milk powder.
·    1 cup buttermilk equals: 1 tablespoon lemon juice or vinegar plus enough milk to make 1 cup (let stand 5 minutes before using), or 1 cup plain yogurt.
·    1 cup light cream equals: 1 tablespoon melted butter plus enough whole milk to make 1 cup.
·    1 cup dairy sour cream equals: 1 cup plain yogurt.
·    1/2 cup liquor (rum, bourbon or whiskey) equals: 1/4 cup unsweetened fruit juice.
·   1/2 cup wine equals: 1/2 cup apple or white grape juice for white wine, or 1/2 cup unsweetened grape juice for red wine (taste the recipe before sweetening; you may need less sugar).
·   1/4 cup fine dry bread crumbs equals: 3/4 cup soft bread crumbs.
·   1 small onion, chopped, equals: 1 t. onion powder or 1 Tablespoon dried minced onion.
·   1 Tablespoon prepared mustard equals: 1/2 teaspoon dry mustard plus 2 teaspoons vinegar.

*If any readers of this posting have other/better suggestions for any of the substitutions, please share-- I'd be happy to have you leave a comment about it.

Monday, December 26, 2011

Hamburger Stroganoff Casserole

Because I had an 8 oz. carton of fresh mushrooms on hand, I decided to make a casserole that I saw being made a while ago on Channel 11's morning show Living with Amy--making only slight changes.  (For example, I did not put red wine into this casserole.) Since we like other versions of stroganoff, I figured we would like it like this, too.  And, the ver-dict is a............................. 'y-e-s!'
For contrast, I sprinkled a little grated Cheddar & Mozzarella cheese on top...
When serving, I added the 'c-r-u-n-c-h!' of seasoned croutons...

INGREDIENTS:
  • or 2 pounds lean ground beef
  • 1 large onion, chopped
  • Salt and pepper
  •  2 to 3 tablespoons butter
  • 8 oz. container of fresh mushrooms
  • 2 cloves garlic, minced
  • 2 tablespoons Worcestershire sauce
  • 2 cups beef stock
  • 2 (10 ¾ ounce) cans cream of mushroom soup, undiluted (Can use reduced fat version.)
  • 1 tablespoon Dijon mustard
  • 1 (16 ounce) container sour cream (Can use 'light', but don't use fat-free.)
  • 12 ounces wide egg noodles, cooked (don't over cook) 
  • 2 (3 ounce) cans French fried onions, optional ( Instead of using these, I offered Mrs. Cubbison's Classic Seasoned Restaurant Style Croutons when serving, as seen below.)

Directions:  

 Spray a 9 X 13-inch baking dish with cooking spray.
  1. In large kettle, cook egg noodles 'almost' as long as directions indicate, drain.
  2. At the same time, in a large skillet or Dutch oven kettle, cook ground beef and onion until crumbly and no longer pink. Drain any grease. Season with salt and pepper.  Set aside.
  3. Using small fry pan, combine butter and mushrooms and cook a few minutes until mushrooms start to get soft.  When mushrooms are about done, add the garlic for just the last minute or so. Add this combo to skillet with browned/drained hamburger/onion.
  4. Stir in Worcestershire sauce and beef broth.  Bring to a brief boil, reduce heat, and simmer a few minutes. 
  5. Stir in soup, mustard and sour cream.
  6. Stir in cooked noodles. If mixture seems too thick, add a little more beef broth or water. (I did not add more liquid.)
  7. Spoon all into prepared baking dish.  Bake in preheated 350-degree oven for 30 to 40 minutes*. If you choose to top with french fried onions, do so at this point and bake for another 10 minutes.    (BUT!!!, even if you do not top with onions, bake another 10 minutes.)
* When casserole was about half done, I checked to make sure the tops of any noodles were not sticking 'out of the casserole' and drying out--  I just pushed them back down/in with the back of a spoon.  Then, I did that once more before the final 10 minutes in the oven.  (I chose not to cover the casserole during baking, because I wanted some of the liquid to 'bake out', and it did.)

Sunday, December 25, 2011

APPLE CRISP-- PIE!*

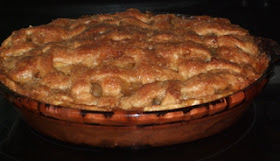
This originally started out to be something called Grandma Ople's Pie.  This might look like a regular pie* (sort of?), but I now call it my "Apple Crisp Pie" because of the way I changed how I like to make it.   There are actual recipes on the Internet for "Apple Crisp Pie", too, but mine looks still different than those, too. 
 
Instead of a crumbly topping being sprinkled on and becoming 'crisp' as with a usual recipe for an apple crisp, it's the "brushed" lattice work crust that is the 'crisp' in this case...
If you don't want to bake this recipe in a PIE dish and use a double crust, you could put the apples in a sprayed/buttered 9x13-inch baking dish, pour 3/4 of the sauce evenly over them, top with a crust and brush the remaining 1/4 of sauce on that (lattice style crust works best because it lets the excess sauce drip through to the apples as they cook).
 
Above:  Because I didn't use all Granny Smith apples, you can see that the slices did not stay very defined-- plus, I baked this 'pie crisp' for an extra 10 minutes.  Some people do NOT like to see apple slices 'too cooked' like this, but I do.
INGREDIENTS NEEDED (for pie form):
  • One recipe of pastry for a 9-inch double crust pie (use your favorite recipe; mine is listed under 'pie crust' on the right side of my blog's home page).  The following mix is the same as in Grandma Ople's pie, but then I change to 'my own directions' with the sweet sauce (syrup?).
----
  • 1/2 cup (1stick) butter
  • 3 tablespoons all-purpose flour
  • 1/4 cup water
  • 1/2 cup white sugar
  • 1/2 cup brown sugar
  • 1/2 teaspoon ground cinnamon, optional
----
7-8 average sized Granny Smith apples, peeled, cored and sliced. (The pictures in this posting are of when I used only four Granny Smiths, and some of another softer/sweeter
variety-- if you like a 'tart' kind of crisp, use all Granny Smiths; if you do not like 'tart', use a combination of yellow delicious and another sweeter apple,)
DIRECTIONS:
  • For a regular Apple Crisp Pie, place the bottom crust into your 9-inch pie dish, cover and set aside.
  • To prepare the sauce (as listed above):  Melt the butter in a saucepan.  Stir in flour to form a paste.  Stirring constantly, add water, white sugar and brown sugar, and bring just barely to a boil.  Immediately, reduce heat to lowest setting and let it 'simmer' like that while you prepare the apples.
Even the peelings are BEAUTIFUL!!!
  • For pie form, fill the bottom crust with apple slices, mounded slightly (mounded maybe by an inch or two).  
  • Slowly pour about 3/4 of your warm butter/sugar mixture evenly over the apple slices so that it can seep through the slices.
  • Cover with a lattice work crustAs you can see in this next photo, the hurry-up in this 'non-perfectionist' does not have the lattice work woven correctly, but, believe me, that is not going to show up, nor matter, once this pie is done. IF I thought this was going to be critically judged, I'd make sure those 'weavings' were done as perfectly as possible.  Besides that, Martha Stewart will not be stopping in today!)
  • Personally, I like doing the following: Very slowly and evenly, pour (brushing works better) the remaining 1/4 of your buttery/sugary mixture over the TOP of the lattice work crust, covering it evenly-- this will make the crust 'crisp'-- thus the name Apple Crisp Pie.
In the photo below, I show that when I first started making the Grandma Ople's pie, the one I now call an Apple Crisp Pie, I poured all (100%) of the warm butter/sugar mix on TOP of the lattice work crust, as directed to!   It is good like that, but, by just looking at the next photo, you just k-n-o-w SOME is going to be seeping into the pie, AND SOME will be running 'over the cliffs'!  Because of this, as stated above, I now prefer to pour 3/4  of the sauce over 'bare apples' and brush (like a glaze) the other 1/4 over the lattice crust.
  • Set pie dish on a parchment paper (see my note about parchment paper under 'Gadgets I Like') or on a foil-lined cookie pan (pan with an edge, for just in case) and bake as directed below.  Placing the dish on paper/foil will save you the job of cleaning the oven if some  of the apple juice and syrupy stuff runs off or bubbles over, ... like this...
Above:  This 'dripover' scrapes off very easily as soon as the pie is out of the oven (see first picture at the top of this posting).
  • Bake in a 425-degree oven for only 15 minutes; then reduce temperature to 350 degrees.  Continue baking for 45-50 minutes, check it.   (With my oven, when I'm using 'double crusts', I have a better experience when I bake this pie on a rack that's one notch lower than middle so the bottom crust will bake better.)
Depending on how many apples you piled into it, you might need to give it more time.  With the mound that I had on this particular pie, I had to add another 10 minutes to the above. Even at the end of the cooking time, just to make sure, I tested 'softeness' of the apples by sticking a fork down into the middle of the pie.

*This was originally intended to be like "Grandma Ople's Pie", and, even if the sauce ingredients have mostly stayed the same, it's now just a little different.

Saturday, December 24, 2011

EZ Brunch Souffle

 A breakfast favorite of ours...
                                                                                                                                     (Photo by me, Doris)

I found this recipe in the Shawano Evening Leader paper so very many years ago.  It was a favorite of the missionaries when they'd come here for breakfast on their P-day.  M-m-m-m-m-m, we like it a lot!

Ahead of time, brown and drain the pork sausage (listed below).

YOU WILL NEED:
  • 10-12 slices bread, cubed without crusts (I use thick "Texas Toast" slices, but French bread works, too.)
  • 1/2 lb. cheddar cheese, grated
  • 1 lb. bulk pork sausage, browned and drained (My personal favorite is a 1 lb.plastic sort of tube of Jimmy Dean Premium Pork Sausage - sage flavored.  If you don't like it this 'herby', use just the 'original flavored' pork sausage.)
  • 4 eggs, beaten
  • 2 and 1/2 cups milk (Ryan said they replaced some of the milk with cream, and some of egg nog--  they liked it like that.)
  • 1 can Cream of Mushroom Soup, plus additional 1/2 can of milk.
  • 1 of 4 oz. can of mushroom pieces, optional
DIRECTIONS:
  1. Put cubed bread into 9x13 cake pan that has been sprayed with PAM (or greased with shortening).
  2. Grate cheese over the bread layer.
  3. Layer sausage over the cheese layer.
  4. Beat eggs into 2 and 1/2 cups milk and pour evenly over the layered mixture in pan.
  5. Cover tightly and refrigerate the above for 12 hours (or over night, or all day).  Just before ready to bake, do this:
  6. Layer 1 of 4 oz. can mushroom slices on top of casserole. 
  7. Mix 1 can cream of mushroom soup with another 1/2 cup milk and pour evenly over the top of the mushrooms.
Bake 1 hour, plus 10-15 minutes at 325-degrees .  Let sit for about 5 minutes before serving.  Serves about 8-10.

Friday, December 23, 2011

Filled Sweet Rolls


The cup was given to me by my V.T.'s Becky H. and Laura R. (Thanks, girls!)  
Thinking of my hubby's late Aunt Alma-- and, missing her. She was such a special and sweet person-- a great homemaker, cooker, baker, great everything!  While our families visited back 'n forth quite often, a farmer's life/schedule can simply 'get in the way' of things we'd like to do.  Now that we aren't as tied down since we sold our milk cows, it's too late.  Special times don't wait for freer schedules, that's for sure.  Lately, I've been thinking of her (and her sister, the late Aunt Esther) very often.  Today, my mind went back to Aunt Alma making what I thought were the BEST kolache's (for the Bohemian in her family, she'd say)!!  Her fillings for these baked goodies varied between prune, poppy seed and other fruit.   OH, SO GOOD!  Well,... with me being much younger and busy with children and farming duties during those earlier years, I never asked her for the recipe--           : (            but, I surely wish I had!

Not having her recipe, I decided to make up a batch of pretty regular (sort of) sweet rolls and 'pretend' they were kolaches in how I prepared them. (I seriously doubt that's something that can be 'pretended', though!)  While these didn't end up as large and spread out as hers were, I am happy to say these turned out g-o-o-d enough that, after having just one, I quickly put them 'out of my sight'!  : )

Yield:  With the dough being rolled to 1/2-inch thick before cutting, I ended up with two dozen rolls, with a small chunk of dough left-over.

INGREDIENTS for the dough:
  • 2 tablespoons dry yeast
  • 1/4 cup warm water
  • 1 tablespoon sugar
----
  • 2 cups milk, heated alone till 'hot to touch'
  • 1/2 cup sugar
  • 1/2 cup butter
  • 2 egg  yolks, slightly beaten
----
  • 5 and 1/2 cup sifted flour (bread flour will make a lighter product)
  • 2 teaspoons salt
----
  • 3/4 more cup of sifted flour
DIRECTIONS:
  • Dissolve yeast in water with the tablespoon of sugar, set aside until frothy.
  • Heat milk in saucepan until pretty hot to touch; remove from heat and add to it the butter and sugar.  When this mixture cools down to being 'just warm', add the 2 slightly beaten egg yolks.
  • Add the bubbling yeast mixture, and mix everything together.
  • Add the 5 and 1/4 cups flour and 2 teaspoons salt to the above.  Using my Kitchen Aid stand mixer, and with the paddle attachment, I let this mix for about 4 minutes.  The dough was still very, VERY sticky!  
  • Dump in last 1 cup of flour and mix with the dough hook on mixer for another 2-3 minutes.  (The dough will still be quite sticky-- some sticky is a good thing!)
  • Remove dough from bowl and transfer to a lightly floured surface for kneading until the surface gets "satiny"-- 5-8 minutes?   (I think I may have used another 1/4 cup of flour by dusting the kneading surface during the first couple of minutes.)
  • Put kneaded dough ball into a rather large greased/oiled bowl, turn 'ball' to oil top,  cover and let rise in a warm place until doubled.  (1 hour?)
  • When fully doubled, punch down; roll dough out to be 1/2" thick, cut with biscuit cutter. (Next time, I'm going to roll the dough closer to 1/4" thick and cut it with a bigger cutter-- mainly, just to see how that works out.)
 
  • Place on greased or parchment-lined baking pan, leaving about one-inch space between each. 
  • Brush with melted butter and let rise again (covered) until light to the touch-- about 25-30 minutes? (If you want to cover rolls at this stage, you can spray a sheet of Saran Wrap with non-stick spray and gently lay that on top-- something that will come off easily without hurting the 'rising that happened'.)
  • Carefully, make a one-inch circular indention in the center of each raised roll and fill with the filling of your choice.  (I used Solo brand raspberry filling for some; and made cream cheese filling* for others.)  Some bakers make a poppy seed OR apricot filling; and sometimes, use canned pie filling.
Above:  For some, I put a dab of cream cheese filling in first, then a dab of raspberry.
  • Let rise while you preheat the oven to 375-degrees.
  • Bake for about 20 minutes.
  • Remove from oven and brush with melted butter, again.

After baking, you can top with glaze** OR... another option is to wait until they are cooled and dust them with powdered sugar through a screen/sifter.

*CREAM CHEESE FILLING:  Beat together 8 oz. package of softened cream cheese with 1 egg yolk, until very smooth.

**GLAZE:  2 cups powdered sugar, 1/2 teaspoon vanilla, 2 tablespoons softened butter and almost 4 tablespoons milk.  Combine all and spoon over rolls while they are still warm.

Thursday, December 22, 2011

Peanut Butter Candy Bar Squares


I saw this recipe on the Betty Crocker website a few years ago, but I've changed it up just a tiny bit.  If I hadn't gotten the peanut butter cookie mix* at a really good sale price, and didn't already have the 14 oz. bag of caramels on hand, I would NOT have given this 'sweet/nutty' recipe a second look.  But, I did............. so,.............. I did! 

*This is the FIRST time in my life that I've bought any kind of cookie mix.  Truthfully, I could never see a reason always wondered why anyone would buy a 'cookie mix' when cookies are so easy to make from scratch.  Well,... I now have an idea as to a possible why--  it could be because some recipes ASK that a mix is used.  Like this one...

Suggestion:  Unwrap the caramels before you start anything.

Ingredients for the Base Layer:
  • 1 pouch (1 lb. 1.5 oz) Betty Crocker dry peanut butter cookie mix
  • 3 tablespoons vegetable oil
  • 1 tablespoon water
  • 1 egg, slightly beaten
  1. Heat oven to 350 degrees
  2. Spray bottom only of a 13x9 baking pan/dish with cooking spray.  (I sprayed the bottom, then lined the dish with foil and then also sprayed the foil liner; on the foil, I left little tabs with which I could lift all up/out for cutting on a cutting board when done/cooled-- see photo below.  I think you could use parchment paper to serve as the 'lifter', too.)
  3. In large bowl, stir above cookie base ingredients until soft dough forms.  
  4. Using a spoon, drop the dough all over the prepared baking dish, then spread it out evenly and press lightly. 
  5. Bake for about 13-15 minutes or until light golden brown. 
  6. Cool completely, about 30-40 minutes.
Ingredients for the Filling Layer:
  • 1/3 cup light corn syrup (I used Karo, the kind that doesn't have high fructose corn syrup in it.)
  • 3 tablespoons butter, softened
  • 3 tablespoons peanut butter
  • 1 tablespoon plus 1 and 1/2 teaspoons water
  • 1 and 1/4 teaspoons vanilla
  • Dash salt
      • 3 cups sifted powdered sugar (Original recipe calls for 3 and 1/2 cups.)
  1. In large bowl, beat all filling ingredients EXCEPT POWDERED SUGAR with electric mixer on medium speed until creamy and smooth. 
  2. Gradually beat in sifted powdered sugar until well blended (filling will be thick).
  3.   Drop this by spoonsful all over the baked layer, then carefully spread it out evenly. 
  4. Refrigerate while preparing the next (caramel/peanut) layer.
Ingredients for Caramel Layer:
  • 1 bag (14 oz. caramels, unwrapped (I. hate. unwrapping. caramels!)
  • 2 tablespoons water
  • 1 and 1/2 cups unsalted dry-roasted peanuts (I used lightly salted Virginia peanuts)
  1. In 2-quart saucepan, heat caramels with 2 tablespoons water over low heat, stirring constantly, until caramels are melted and creamy smooth. 
  2. Add peanuts.  Stir over the low heat for just a very little while longer since the addition of the peanuts may have cooled the caramel too much to spread easily.  When everything is evenly hot, spread this caramel/peanut mixture evenly over 'filling' layer. 
  3. Refrigerate for about 30 minutes, or until caramel layer is quite firm.
Ingredient for Topping:
  • 1 bag (about 2 cups) milk chocolate chips
  1. In small microwavable bowl, microwave chocolate chips uncovered on High for one minute, stir; microwave for one more minute, stir. 
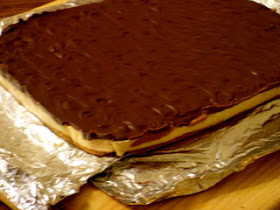
  2. Then, when totally melted and smooth, spread evenly over cooled and firm caramel/peanut layer.  (A few minutes after putting the topping on, I used the tip of a skewer stick to make swirls in it.)  
Refrigerate for 2-3 hours or until chocolate is set.
  
IF you used aluminum or parchment paper to line the pan before baking the base (as shown below), lift out... 
It is so, SO easy to cut them into neat-edged squares after lifting them out of the pan/dish...
 (Because they are 'sweet', it's probably best to keep pieces a bit on the small size.)  Store covered at room temperature, or wrap/freeze.

Enjoy!

Wednesday, December 21, 2011

Spinach/Sausage/Cheese Stuffed Manicotti**

Since finding this particular recipe in 2007, I've made and liked this Manicotti pasta stuffed with sausage, chopped spinach, and ricotta, mozzarella and cheddar cheese, eggs; topped with a favorite spaghetti sauce.

  
With this, you can make just 1 lb. meat go far! These are good (and fancy) enough to serve 'for special', but are easy to make!   According to the website (see bottom) where I found this recipe, it was found in a great little booklet called, Dinner on the Double, by Better Homes and Gardens."  (It was listed in a collection of recipes considered to be Low-Glycemic.)

For me, the 'filling' mix below ends up being enough to stuff about 23 of the large Manicotti pasta tubes-- this means you'll need a very large baking dish, or use two separates.  Of the two 14-ct. boxes of Manicotti, there may be about five 'left over' (empty).

INGREDIENTS:
  • 2 boxes (8 oz. each) Manicotti pasta tubes (this may total 28 'tubes')*
---------------
  • 1 lb bulk pork sausage, cooked and drained (I used a one pound tube of sage flavored sausage).  To get more fat out of the sausage, I start frying with water added.  When browned, I drain fat off and 'rinse more off' by pouring very hot water over sausage in a colander.
  • 10 oz frozen chopped spinach, thawed, squeezed and drained
  • 4 eggs, slightly beaten
  • 2 cups ricotta cheese (can use low-fat variety)
  • 2 cups shredded mozzarella cheese
  • 2 cups shredded cheddar cheese
---------------------------
3 cups of your favorite spaghetti sauce

*You can also use the jumbo SHELL pasta (you'll need about 32 of them) and they make for a super pretty finished dish, but... although I've used them,  I don't care for how, when boiling them, they like to 'nest' into each other causing some to end up with little rips as they are pulled apart.

DIRECTIONS:
  1. Cook pasta according to package directions and add 1 minute to that. Drain and rinse with cold water, and drain again.
  2. Combine remaining ingredients, except spaghetti sauce, in a large bowl and mix very well.
  3. Fill each pasta tube.  (I like to use my large pastry bag for this-- without using a special tip you can squirt the filling the length of the tube with a little "oomph", but a plastic bag with a snipped off corner m-i-g-h-t work, too.)
  4.  Spray your baking dish with non-stick.  It works great to put down a thin layer of spaghetti sauce.  Place the filled pastas in the dish.
  5. Top with your favorite spaghetti sauce. (I used Chunky Ragu Garden Combination.)
  6. Bake at 350 degrees until heated through, about 30-40 minutes.  Cover loosely with foil if you notice the top getting darker than you'd like.  (If baking from frozen state, add minimum of 30 minutes and then check for doneness.)
  7. To freeze:  It is best to freeze before baking.  You may freeze individually wrapped filled pasta without sauce, or freeze sauce-topped shells in a baking dish (tightly covered).  How I freeze these 'individual filled pastas' without the tomato sauce on them:  Space them on a  baking sheet lined with plastic wrap or parchment paper;  freeze overnight; remove them, vacuum seal the number you want in a bag; date/label and return to freezer. 
  8. Yield:  10-12 servings 
** I first made this back in 2007, and it hasn't gotten 'old' in that it remains an especially easy  'go to' recipe for me when having Sunday dinner guests-- I say that because it can be prepared ahead of time and served the next day, OR frozen and baked whenever needed.  I found this recipe on the website of Natural Health Doc, Dr. Linda Hadley, N.D., D.SC., Ph.D.