Bubbly Hot Apple
Pie!
"My Apple Pie" = This might seem like a 'weird' way to make an apple pie, but it works for me!
This was just 'that kind of day'-- I had apples here,
I felt like making a pie,
and there would be family/friends here
in the afternoon to share it with! Reasons ENOUGH!
INGREDIENTS FOR PIE:
Two crusts-- one for the bottom, and another for the top.
10 med. sized apples of your choice (I use a 'mix'), peeled, halved, cored and sliced (about 1/8" thickness).
Water in large kettle for 'steaming or heating' the apple slices while the following is being prepared.
3/4 cup butter
1/2 cup white granulated sugar
1/3 cup brown sugar, packed
1 teaspoon ground cinnamon
1/2 teaspoon vanilla
1 tablespoon cornstarch (no lumpy cornstarch allowed!)
INGREDIENTS FOR A PIE CRUST 'WASH':
1 egg yolk mixed smoothly with 1 tablespoon cream. With soft pastry brush, brush this onto pie crust surfaces about midway into the baking time. This helps the crust to have a sort of 'golden shine' when it is done.
DIRECTIONS:
- Very lightly spray pie dish with non-stick spray.
- Lay bottom crust into pie dish (cover with plastic wrap if it will be 'waiting' for a while).
- Start the hot water for 'heating/steaming' the apple slices when you get them prepared.
- Peel, core and slice apples. When all are 'prepared', dump them into a colander or steaming basket over the boiling water. Let them 'steam/heat' while making the sugar/cinnamon sauce as follows.
- In a medium-sized saucepan over medium heat, melt the butter; stir in the white sugar, brown sugar and cinnamon. Stir well.
- When well blended and 'bubbly hot', stir in the vanilla.
- Using a whisk, AND TO AVOID LUMPS, carefully add the cornstarch a few 'sprinkles' at a time while stirring constantly. (To do this, I like to put the cornstarch into my tiniest little strainer which holds about 1/2 cup maximum and gently shake it to put the cornstarch in a little at a time.) Whisk together until all is smooth.
- Now, put the 'steamed' apple slices into a bowl; dump the caramel sauce on top and gently mix until the apples are coated.
- Dump the apple/sugar mixture into the prepared bottom crust.
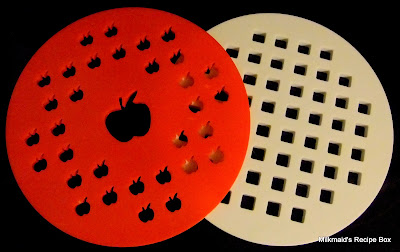
- Prepare the top crust as you like and cover the apple/sugar layer. Sometimes, I cut dough into strips for making a traditional kind of lattice top. Sometimes, ...a solid crust with little slits to let the steam out. Other times, I use a plastic crust 'designer disk' which is so very quick-- the plastic 'designer' makes a top crust like this...
I used four of the little 'cut out apples'
for added decoration...
- Put pie into 350-degree oven for 30 minutes. Remove from oven and gently brush all of the pie crust surfaces with 'pie wash' (recipe above) and return to the oven for about 30 minutes more. DO CHECK how the edges of your pie crust are doing-- if they are getting too dark too quickly, cover edges of the crust with aluminum foil or a ready-made 'pie crust shield'.
Below: THIS IS ABOUT THE DESIGN DISKS I USE
FOR THE TOP PIE CRUSTS. I also included these
in/among GADGETS I LIKE which can be
found in the index down along the right column.
in/among GADGETS I LIKE which can be
found in the index down along the right column.
The two below are made by Norpro and they sold
for $3.48 each. They might cost a bit more
these days. (?) If you are interested in buying
any of these 'forms', you could check at a kitchen
supply kind of store, or...just do a google search for
" Lattice & Hearts Pie Top
Cutters "
Once you bring up a list of websites, click on "images"
so you can see the various design disks that are available.
Below: The red pie crust cutter with heart design is REVERSIBLE and can be found at: http://www.everythingkitchens.com/nordic-ware-heart-lattice-pie-cutter-04010.html
The gold pie crust cutter with the apple design is ALSO reversible and can be found at:
http://www.everythingkitchens.com/nordic-ware-leaves-apples-pie-cutter-04020.html
Below: Here, you see the REVERSE side of the two directly above...
Above: The designs are raised and their edges are quite sharp. To use them, I first roll the crust to the thickness I want. Then, I carefully lift it from the table and lay it across the designed disk. Next, I take the rolling pin and gently press it down as I roll it over the sharp edges of the crust designs. Just make sure you have the crust rolled down on ALL areas of the raised designs so that when you lift the crust to put it on the pie, you have well-cut openings which make your design. Some bakers say to lightly dust either the crust or the design disk so that you'll be able to more easily lift the crust off.
Below: When I've used the pre-made crusts like what came in this box, I haven't had to flour the crust nor the disk. But, I suppose if the crust were to get a little too warm, I would HAVE to use a little flour to prevent sticking/tearing. (?)
Yesterday was the perfect Saturday
for me to make a pie because...
for me to make a pie because...
I could share it with Steve, Andy,
Wayne, Pam and Emani-- and I did!


