Milkmaid's Recipe Box

FOOD, FOOD, FOOD! I'm such a FARMER at heart-- even a CALF knows that so much in life is about the FOOD! (A bit of a "bio" about me can be found way down near the bottom.)

You can find a recipe index entitled "Labels" down along the right side, starting below the picture of the farm. Then, below the "Label" list are pictures of some of my old "standbys"-- click on their picture and it should take you to the recipe.

You will see no advertising on my blog; this means there is no monetary benefit for me having "visitors" or "joiners"-- having said that, if you do wish to JOIN my blog, you can do so by scrolling w-a-y down to near the bottom of the page...

My Visitors

Locations of Site Visitors
Showing posts with label Bread. Show all posts

Saturday, August 31, 2019

Nadine's Bread (six large loaves)

These six 'babies' made our house smell better today than............. ANYthing else could have! 


The 'slashes' on the top keep the loaves from getting any 'stretch marks/tears' at the top of the pan during the baking process.
This bread is so-o-o-o-o-o soft... 
 And,...........has a great texture...

From way back in the mid-50's when my brother and I sometimes spent time with our sister and her hubby, I remembered her 'so good' bread!  After I married in the early 60's, I asked her for the recipe and she gave it to me.  I have kept all the ratios in her recipe the same, but use honey instead of sugar, butter instead of lard (only because I don't know where to get PURE lard without rendering it out myself), and I often use a mix of white flour/wheat flour.

Use basic bread making techniques to make this bread.

YIELD:  6 large loaves (9x5" pans, greased well).  Because my daughter does this, I put one piece of parchment paper (cut to the size of the pan bottom) into the greased pan and then I grease the paper, also.  That way, there will NOT be any surprises with loaves wanting to 'hang around in their pan' longer than I want them to.

INGREDIENTS and DIRECTIONS:
  • 4 cup scalded milk, cooled to only 'warm'.  Heat milk over med. heat just until you see little bubbles forming around the edge of the pan, like this....
If you add the next four ingredients to the hot milk, it helps to cool it down to 'warm'.  Add in the order listed...  
  • 1/2 cup (1 stick)  butter
  • 8 teaspoons salt
  • 2 cups water (cool water if you need to cool the milk, warm water if milk is already cooled to 'warm'
  • 1/2 cup honey
~~~
In a medium bowl, gently whisk the following together and let it sit just until yeast activates and bubbles up.  The sugar is used to speed up the process.
  • 2cups warm water (water should not be hot).
  • 4 tablespoons instant dry yeast
  • 2 teaspoons sugar
~~~
  • When the yeast has 'bubbled up', add it to the milk mixture and gently whisk together.  You are ready to start adding the flour.
  • First, add 6 leveled cups of 100% whole wheat flour.
  • ABOUT 13-14 cups white bread flour.  Now, I add white BREAD flour-- at first, I add about 13 leveled cups of white flour.  Then, ... I keep adding bread flour slowly as I begin kneading--  I only 'add' more flour until the dough is 'knead'able.  In all, this may amount to me adding around 14.5 cups of the white bread flour. For some reason, it is not always the same amount.* 
After I kneaded the bread for 5-8 minutes, I put it into a greased or oiled bowl-- I turn the ball of kneaded dough so that the top is also greased/oiled. The dough looked like this at the beginning of the first raising period...
 

After raising for about 60-70 minutes in the oven with only the oven light turned on, it looked to be 'doubled' like this...

  • When the dough doubles, I 'punch it down' and let it rest for thirty minutes. 
  • I removed dough from bowl, divided it into six dough balls and let them rest for ten minutes.
  • One by one, I rolled the dough balls into a small rectangle with a rolling pin.  Then, starting at one end, I rolled it up, pinching and sealing ends/edges as I went along. 
  • Place 'dough log' into greased pan.  With 'greased hands', I grease tops of the little 'bread logs', too.
  • Put in warm place to raise in pan.  I often set the pans of dough in the oven with just the oven light on.
  • When I see the bread is about 1" above the edges of the pans, I carefully remove pans from oven where they were raising and pre-heat the oven to 400 degrees.
  • **While the oven is pre-heating, I ever so carefully 'slash' the tops of the bread.  This is done so that, during the baking process, the loaves do not 'stretch' in the area just above the pans-- according to bread bakers a whole lot smarter than I am, this 'slashing' lets steam out the top and gives 'stretching room'-- I like it! (See my note at the bottom.)**
  • After baking at 400 degrees for about 10 minutes, I turn oven temperature down to 350 degrees and let them bake for another 20-25 minutes OR until done.  To test for doneness, you can knock for a 'hollow sound'; judge by the color AND 'knocking'; or use an instant read thermometer like I do (I like 'done' to be an internal temperature of 190 to 192 degrees).  
  • Remove from oven, tip loaves out to cool on a wire rack. Set upright. Butter tops.  Cool, slice and enjoy. 
  Like my sister sometimes did, you could also make this bread using all white bread flour, but it would take MORE of the white bread flour.


 ** Slashing the tops:  I had tried to do this in the past.  Unsuccessfully, I might add!  Each time, the knife would cause the bread dough to 'fall' a bit.  Oh, nuts!  That was before I found this website where it told me the knife had to be super sharp (that I already knew) and that it helps to have oil on the blade (something I did NOT know).  http://www.thefreshloaf.com/node/1680
Now, I sharpen my long carver's knife and coat it with oil--  ah, MAGIC!!!!  In the picture below you can see what I use-- this professional grade sharpener from my daughter's husband and the long super-sharp knife--
A proper kind of "slash, slash" = NO FALLING dough!!!!   And, because I 'slashed', I have no 'stretch marks' showing up on any area of the baked loaf.  I DO LIKE THAT!!! 

Monday, March 26, 2018

Potato Dinner Rolls

I found this recipe in a folder I started adding to years ago.  This recipe looks so much like the one used by Jeanette-- I wonder if this was a handout from a church meeting a long time ago.  Maybe it was from her!  If so, that just means it will always be a winner.  Yes, a keeper!

INGREDIENTS:
  • 1 tablespoon dry yeast
  • 1 teaspoon sugar
  • 1/2 cup additional sugar
  • 1 and 1/2 teaspoon salt
  • 1 cup mashed potatoes (no liquid added to them)
  • 2 and 1/2 cups potato water (from the boiling process)
  • 1/2 cup shortening
  • 2 eggs, beaten
  • 3 cups flour
  • 4 more cups of flour (about)
DIRECTIONS:
  1. Dissolve yeast in bowl with the 1 tsp. sugar and set aside until frothy and bubbly.
  2. Mix together the 1/2 cup sugar, salt, mashed potatoes, potato water and shortening.  (This could be beaten with a hand mixer to blend well.)
  3. Add the 'rising' yeast mixture.
  4. Add first flour (3 cups).  Mix well.  Let this rest for about 5 minutes.
  5. Gradually, add the remaining amount of flour (not all at once).  Do not add more flour than recipe calls for.
  6. Put into greased bowl and turn to grease top.  Cover bowl and let rise until doubled. 
  7. Place 'doubled' dough on generously floured board.
  8. If necessary, sift a tiny bit of flour over the dough so it won't stick to your fingers.
  9. Now, you can break pieces off and shape into 'balls', or you can just cut off 'squares of dough' with a spatula and put them onto a greased or parchment paper-lined baking pan. 
  10. Let rise slightly.
  11. Bake 13-15 minutes in oven preheated to 350-degrees.

Friday, January 5, 2018

Whole Wheat Cinnamon Bread

INGREDIENTS:
  • 1 tablespoon dry yeast
  • 1 teaspoon sugar
  • 1/2 cup warm water
  • 1 tablespoon salt
  • 1/2 to 2/3 cup mashed potatoes (no liquid added to them)
  • 2 cups potato water ( lukewarm)
  • 3/4 cup maple syrup (may substitue 1/2 cup sugar, or 1/2 cup honey)
  • 3 tablespoons shortening
  • 2 cups whole wheat flour
  • 2 cups all-purpose white flour
  • About 4 and 1/2 cups additional all-purpose white flour
DIRECTIONS:
  1. Dissolve yeast in 1/2 cup warm water and teaspoon of sugar.  Set aside until bubbly, frothy, and rising a bit.
  2. Place salt, mashed potatoes, potato water, maple syrup and shortening into mixing bowl. Beat together until well blended and smooth.  Mix at high speed for about 3 minutes.
  3. Add bubbly yeast mixture. Mix well. 
  4. Add wheat flour, and 2 cups white flour.  Mix well. Let this rest for about 5 minutes.
  5. Gradually, add more white flour by dumping 2 of the additional cups into the above mixture and let it mix together. 
  6. Put remainder of the 'additional' flour in a bowl where you will be working on the table and knead however much is needed into the dough.  There may be some of the remaining 'additional' flour left over, and that's okay.  Knead by hand for about five minutes.
  7. Place dough into greased bowl, turning to grease top.  Cover, and let rise until doubled (about 1 hour).
  8. Divide for making two loaves.  Cover and allow the dough to rest for about 15 minutes while greasing the two loaf pans.
  9. Roll dough balls out into a rectangular shape so that one edge is the length of your baking tin, and the other edge is longer. 
  10. Now, cover this rectangle with a mixture of cinnamon and a little bit of sugar (stay about an inch away from the long outside edge), and roll into a 'log' as you would do for a jelly roll.
  11. Seal edges by pinching together.  Place into greased pans, let rise for between 35-45 minutes or until about an inch over the top of the pans.
  12. Bake at 350-degrees for 40 minutes. 

Thursday, April 23, 2015

Corn Bread

"We all have the Native Americans to thank for corn bread.  Its humble beginnings can be traced back to the Indians that the European settlers came in contact with when they first arrived in America." (http://www.indians.org/articles/corn-bread.html)

We (my husband and I) have invited the sister missionaries to join us for supper tonight.  Planning to try a new (new to me) recipe for corn bread, I decided to make a skillet of it this morning.  That way, if it didn't turn out, or if I didn't like it, I could scratch the idea and make some dinner rolls.  Well,... I say this recipe is a "GO" for tonight, and beyond.  The credit for this recipe goes to someone named "Nandabear".

As I was making this, I thought of a particular grandson (Matthew, shown below) because he always liked it whenever I served this in the past-- but, confession-wise, my "cornbread of the past" usually came from one of those little blue boxes.  NOT this time around!!


This recipe makes enough to serve 10 (I'd surely cut this recipe in half for a small family.)

INGREDIENTS:
  • 1/4 cup vegetable oil
  • 2 cups white cornmeal-- but, I used yellow cornmeal today.  (Personally, I like to look around and find Non-GMO corn meal--  an Internet search will help you find some brands of it.)
  • 3/4 cup all-purpose flour
  • 1/2 cup white granulated sugar
  • 4 and 1/2 teaspoons baking powder
  • 1/2 teaspoon baking soda
  • 1 teaspoon salt
  • 2 eggs
  • 2 cups buttermilk (To make this, I added two tablespoons of fresh-squeezed lemon juice to a scant two cups of whole milk, and then let it sit for about 15 minutes so it could do its "curdle thing".)

DIRECTIONS:


  1. If you DON'T have regular buttermilk on hand, make your own by adding lemon juice as I did.  Do this now so it can sit and do it's "curdle thing" for a little while.  Skip this step, of course, if you have regular buttermilk on hand.
  2. Preheat oven to 450-degrees F.
  3. Pour vegetable oil into a 10-inch cast-iron skillet and swirl the oil to coat bottom and sides of skillet.  Place skillet (with the oil in it) into the pre-heated oven until very hot, OR for 3-5 minutes.  Set a timer so you do NOT forget about this being in the oven.
  4. Remove skillet from oven, and set aside.
  5. Whisk together the cornmeal, flour, sugar, baking powder, baking soda, and salt in a med. sized mixing bowl. 
  6. Beat eggs in a separate bowl, and then stir the buttermilk in.
  7. Pour half (2 tablespoons) of the hot vegetable oil from the skillet into this buttermilk mixture.  Beat until oil is incorporated.  
  8. Mix buttermilk/eggs/oil mixture into dry ingredients to make a smooth batter. 
  9. Pour batter into the still hot/warm skillet.
  10. Bake in the oven until top is golden brown, or 18-20 minutes.  This is how mine looked at 18 minutes when I took it out of the oven.  
                                  
Since ovens vary, check yours so see how it is coming along after the first 15 minutes.  IF you do not want the top to get as dark as what mine did, here, you might want to lay a piece of aluminum foil very lightly over the top when it gets to the desired "brownness" and continue baking until it is done.  (At 18 minutes, I tested this with a wood toothpick to see if I thought it was done-- the toothpick came out "clean" so I took it out.)

Cut cornbread into servings while in the skillet, and serve while warm.  If baked ahead of time, like I just did, warm it in the oven just before serving time.
After taking that big wedge of corn bread out of the skillet and............. well, you know,...... eating it while the butter was melting on it,............... I think I just may have made a meal out of this.  OINK!!!, OINK!!! ... to ...ME!!!!   

Tuesday, March 10, 2015

Two Loaves of Cinnamon Raisin Bread


It's been a while since I've made this kind of bread, and I was wanting some.  It wasn't hard to figure out that just LOOKING at the recipe wasn't going to produce anything edible, so,... I decided to give this a go and I like how it turned out.  Here are the two loaves, still showing signs of the butter I put on their hot tops right out of the oven...


INGREDIENTS:

2 tablespoons butter
2 teaspoons salt
3 tablespoons granulated sugar
1 cup milk
.....
1 cup water (cold, or cool)
.....
1 tablespoon yeast (I used instant)
1 teaspoon sugar
1/4 cup warm water (about 100 degrees)
.....
5 and 1/2 cups all-purpose flour (approximately).  Could use up to a total of 6 cups, but try to not use more than six unless the dough is just way to moist and sticky to work with.
1 and 1/2 cups raisins
.....
4 tablespoons butter, softened
1/2 cup brown sugar, packed
5 teaspoons ground cinnamon

DIRECTIONS:

Before starting, I prepared my pans.  I used two of the 9x5" pans.  I sprayed interiors with non-stick spray and then put one long strip of parchment paper in the pan (just the width of the bottom of the pan and placing it the long way and "up the ends").   I also sprayed that strip of parchment paper and set the pans aside.
  1. In a saucepan over low heat, combine shortening, salt, sugar, and milk.  Heat until very warm and until shortening is melted.  Remove from heat.
  2. Add the 1 cup of water to the hot milk mixture. If you add cool/cold water, you'll be able to cool the hot milk mixture down to the required "lukewarm" temperature a bit more quickly before proceeding.
  3. In a small bowl, combine 1/4 cup of warm water and yeast-- add the one teaspoon of sugar.  Stir and let sit for about 5 minutes so it can dissolve and "grow" (puff up).  Keep an eye on this so it doesn't "puff up" and escape the bowl!
  4. Pour the lukewarm milk mixture into a mixing bowl.  Add just 3 cups of the flour, and the "growing" yeast.  With the mixer fitted with the paddle attachment, beat at medium speed until well combined.
  5. Add 2 more cups of flour and mix well.
  6. Add raisins and thoroughly combine.
  7. Turn dough out onto a lightly floured surface.
  8. Knead for 2 minutes adding just enough flour so that dough is not sticky-- try to not add more than just 1 more cup of flour, total.
  9. Allow dough to rest for 10 minutes.  
  10. Knead dough until it is smooth and elastic, about 5-10 minutes. 
  11. Put the dough into a large greased bowl. 
  12. Cover with a clean towel and place in a warm area until it has doubled in bulk, about 1 hour.
  13. Melt butter in a small bowl.  
  14. In a separate small bowl, combine brown sugar and cinnamon.
  15. Punch dough down and divide evenly in half.
  16. Leave one half in the greased bowl, covered, and place the other on a very lightly floured surface.
  17. Pat and shape the dough into about an 8-inch square.  (Some of the raisins like to escape, but I just tucked them back in.)
  18. Brush the square of dough with 1/2 the butter.
  19. Sprinkle 1/2 of the cinnamon/sugar mixture completely over the entire surface.
  20. Beginning at one side of the square, slowly roll the dough.  Pinch one end together and fold under the roll.  Repeat with other end.
  21. Place roll into a greased loaf pan.
  22. Repeat process with other half of dough;  pat and shape into a square, brush with butter, sprinkle with remaining cinnamon/sugar, roll, pinch to seal the ends and place into greased loaf pan.
  23. Place loaves in a warm place, cover with a towel, and let rise till double in bulk again, about 1 hour.
  24. Preheat oven to 400-degrees F.
  25. Bake bread for 15 minutes.
  26. Reduce heat to 350-degrees F.  (If bread browns too quickly lay sheet of foil over top of loaf until done.)
  27. Continue to bake for 30 additional minutes, or until internal temperature reaches 196-degrees.
  28. Remove from pans, brush with butter, and cool on a wire rack.
Recipe adapted from Fanny Farmer Cookbook, 13th Edition; and also from site of 365 Days of Baking & More.


Monday, February 10, 2014

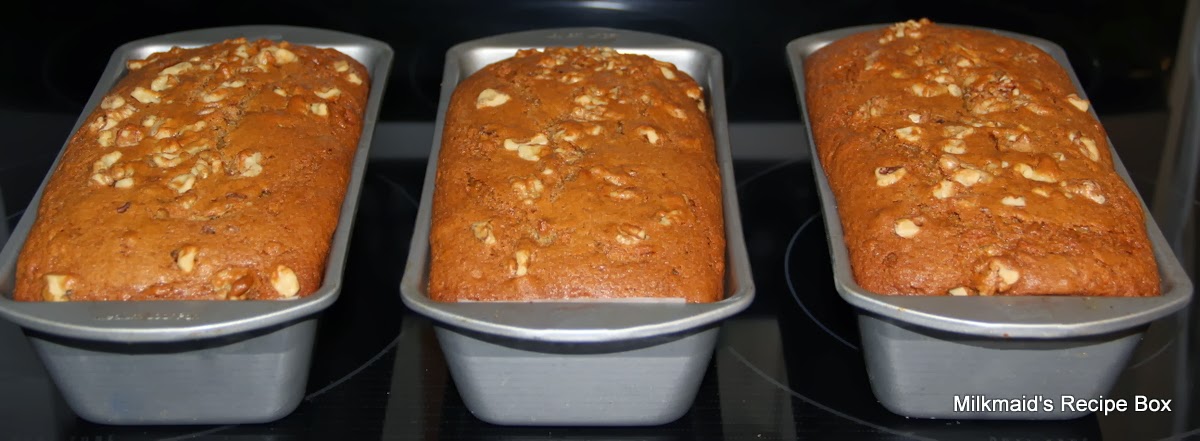
Banana Bread w/Sour Cream*

I will be KEEPING this recipe so I can make more of these!

INGREDIENTS:  

3/4 cup unsalted butter, softened
2 cups white sugar
1 cup dark brown sugar, packed
3 eggs
6 very ripe bananas, smashed (but not into "mush")
2 cups (16 oz.) sour cream (I used Daisy brand)
2 teaspoons vanilla extract
2 level teaspoons ground cinnamon
1/2 teaspoon salt
3 teaspoons baking soda
4 and 1/2 cups all-purpose flour
1 and 1/2 cups chopped walnuts (optional)

DIRECTIONS:  
  • Preheat oven to 300 degrees F (150 degrees C).
  • Grease three of 4¼" x 8½" pans (I measured inside the edges of their top opening).  I like to not only grease/spray the pans, but I also put a long strip of parchment paper down the end, along the bottom and up the other end of each pan and then lightly grease that, too (or very lightly spray it with  "non-stick").  By doing that, it makes loaf-removal less of a "breath-holding" experience.
  1. In a large bowl, cream the softened butter with the 2 cups of white sugar and 1 cup brown sugar. (I used my stand mixer for this.) 
  2. Mix in eggs (one at a time), smashed bananas, sour cream, vanilla and cinnamon.
  3. Mix in salt, baking soda and flour... until evenly blended.
  4. Stir in nuts.
  5. Divide into prepared pans (my pans ended up being filled to almost 1/2" of their top edge).  Before baking, I sprinkled a small amount of chopped walnuts on top of batter and gently pressed them in (just a little).
  6. Bake for 1 hour plus 15 minutes OR until the small/clean/sharp blade of a knife gently inserted in the center comes out clean.  (With the oven I was using, I had to add just a few more minutes.)
  7. Remove from oven, let sit in pans for about 10 minutes.
Remove from pans and lightly butter the tops.Let cool.  Slice.  Enjoy!   (Because these came out of the oven at bedtime, I set them on a layer of dish towels, covered them up with a few more; these were SO READY to CUT and ENJOY by this morning.)


* I changed a few things in the recipe I was sent. I first put a strip of parchment paper into the greased/sprayed pan and then sprayed that.  Then,... the original recipe said to dust the inside of the greased pans with a mixture of sugar and cinnamon, but I opted to NOT do that because I didn't want their outsides to get too dark.  I replaced one cup of white sugar with a cup of dark brown sugar; I used UNsalted butter; and baked the bread in three "larger" pans instead of the four "smaller" ones called for.  Also,...I added 1/2 cups of walnuts, and used some of those for sprinkling on top of the batter before baking.

Monday, February 3, 2014

ANADAMA Bread


"This recipe's name comes from a New England fisherman whose lazy wife always served him corn meal mush and molasses.  One day, tired of the same corn meal mush for dinner, he mixed it with flour and yeast and bake it as bread, saying:  'ANNA damn her.' "  

That story behind this recipe's name comes right out of an old (OLD!) Betty Crocker's Picture Cook Book.  I think it's a book from the late 50's and I bought it back in 1961 when I was in Home Economics class and gave it to my mother. Even though she didn't need recipe books to make many delicious things for daddy and us eight kids, she did use this book quite a bit.  

Today, thinking of (and missing) my mother, I looked through this book to find some kind of old recipe to have fun with.  For no special reason, I settled on ANADAMA BREAD.  

Oh, wait!-- it might have been the story that's printed up above that caught my eye and played with my curiosity.  Here is the recipe:

Bring to boil in saucepan:
     1 and 1/2 cups water
     1 teaspoon salt.

To prevent lumping, SLOWLY sprinkle in:
     1/3 cup yellow corn meal
Return to boiling point, stirring constantly.
Pour this into a large mixing bowl.

Stir in:
     1/3 cup molasses
     1 and 1/2 tablespoon shortening
Cool all to lukewarm

Dissolve 1 tablespoon yeast granules in
1/4 cup warm water (not hot, just 100-110 degrees)
with 1/2 teaspoon sugar.

Add the dissolved yeast to the lukewarm corn meal mixture.
Mix well.

*Original recipe asks for a total of from 4 to 4 and 1/4 cups sifted all-purpose Gold Medal flour, but please read what I did at the bottom of the recipe.*

First, mix in one-half of the total flour amount.  Then, add just enough of the remaining flour to handle easily; mix with hand (dough will be sticky).  Turn unto lightly floured board; knead for a few minutes, and let rise until double (about 1 and 1/2 hours).

Punch down, shape into loaf shape, place in greased 9x5x3" loaf pan.  I like to put a strip of parchment paper (lengthwise) in the bottom of my bread pans.  I then lightly spray the strip of paper and the pan sides with something "non-stick"-- but, a light coating of shortening would serve the same purpose.

Brush top with melted butter.  Sprinkle with a very small amount of yellow corn meal and coarse salt.  Let rise in pan until about 1-2 inches above the pan-- it will look like this: 


As shown in the picture below:  I am sure it is not necessary, but I often like to make a couple of slashes/gashes in the risen bread before I bake it to prevent the "stretching" that sometimes happens just above the top edge of the pan while baking.  To successfully make the "slashes/gashes" without causing the dough to "fall", I have to use a knife with a blade that is VERY sharp and coated with cooking oil.  Then, ever so lightly, I make the gashes like this... 

Bake at 375-degrees for 40-45 minutes OR until a rich brown.   (Only because I already have an oven-proof probe thermometer, I often insert it into a loaf of bread after it's been baking for about thirty-minutes, shut the oven door, and it "sounds an alarm" when the internal temperature reaches 200-degrees.)  Ovens vary, so watch how yours does with this-- you may have to adjust the temperature and/or time a bit. If the top of the loaf browns too quickly, put a sheet of aluminum foil over the top until it's done.  Makes 1 loaf.  Coming out of the oven, mine looked like this:
While making this bread, I was wondering if it 
would have a strong molasses taste, but, 
in my opinion,  it is "ever so slight".
ENJOY!!!!

*By using King Arthur's BREAD FLOUR, I didn't 
use much more than a total of 3 and 1/2 cups... 
plus a very small amount for the counter top.

Monday, August 26, 2013

Double Chocolate Zucchini Bread* (actually, it's more cake-like!)


If you are "into" CHOCOLATE, 
you will probably like this.  

If you are NOT, ...do NOT make this!!!

"Double Chocolate" =  very CHOCOLATE'Y!!

In addition to cocoa, each loaf 
has a whole cup of semi-sweet 
chocolate chips in it! (To make it with "less of strong chocolate", use milk chocolate chips, or leave 'em out altogether.)


INGREDIENTS:


The following ingredients make just ONE of the 8x4-inch loaves.  Double all ingredients to make two as shown above.
1 and 2/3 cups all-purpose flour
1/3 cup Dutch-process cocoa powder (I used Hershey's cocoa)
1 teaspoon salt
1/2 teaspoon baking powder (I use aluminum-free)
1/2 teaspoon baking soda
...
2 large eggs
1/2 cup vegetable oil (I used Smart Balance blend)
1/2 cup light brown sugar, packed
1/3 cup honey (I used honey fresh from our son's beehives)
1 teaspoon vanilla extract
....
2 cups shredded zucchini (If using larger zucchini, cut in half and remove seeds along with its "drier stuff"-- I don't peel it.)
2 cups semi-sweet chocolate chips.  (Use milk chocolate chips IF you would rather have a more mild chocolate flavor!, or leave the chips out altogether.)
 I love nuts! and I would like to have put some in here, ...but not every family member likes them as much as I do!  Besides, my pan was FULL ENOUGH without anything else being added.

DIRECTIONS:
  • Preheat oven to 350-degrees.  Spray an 8x4-inch loaf pan with non-stick spray.  I also cut a long/thin piece of parchment paper that will go down the end, along the bottom, and up the other end.  I spray that, too.   It seems to take the "hope" out of removing the loaf when it's done.
  • In a medium bowl, whisk together the dry ingredients (flour, cocoa, salt, baking powder and baking soda).  Make sure everything is very evenly mixed together. (It's not necessary, but I also ran this dry mixture through a strainer-type sieve to get rid of any small lumps that could be in the cocoa,)  Set aside.
  • In quite a LARGE bowl, whisk together the eggs, oil, brown sugar, honey and vanilla extract.  Once this is mixed together, I like to let this stand for a few minutes so that the liquid (eggs and vanilla) can sort of "melt" the granules of brown sugar.   Maybe five minutes, ...and then I whisk it for a little bit, again.
  • NOW, I dump the bowl of whisked together "dry ingredients" into the large bowl  of the whisked together "wet" ingredients.  Before stirring, I also dump the grated zucchini and the chocolate chips on the top of all.   At this point, I start stirring/blending/folding with a wide spatula or wooden spoon.  I just want to make sure things are blended together-- over-stirring may cause a drier/tougher loaf than I want.
  • Pour the batter into the prepared loaf pan.  When I saw how much batter I had in comparison to the size of the smaller loaf pan, I thought I would surely be in "trouble" because the batter came to 1/2" from the top of the pan.  I was picturing a serious kind of "bake-over" in the oven, but,... it didn't happen.  All was well.  
  • Bake for 65-75 minutes, or until a toothpick (or thin sharp knife) inserted into the center comes out with just a few moist crumbs attached.  Depending on your own oven, and especially if you will be using a DARK kind of loaf pan, you might want to put a baking sheet on the rack that's below the rack you're using-- this may keep the bottom of your loaf from getting too dark before it's done.  My pans were "light colored", so I didn't have to do that.  Some bakers say the baking time may also have to be decreased a little if you are using a dark pan (a glass loaf dish, too?).  You know your oven better than anyone else-- bake accordingly.
  • Allow to cool in the pan for 15 minutes, then turn out onto a cooling rack to cool completely before slicing-- sometimes, it's hard to wait for that!!!  Store leftovers at room temperature, tightly wrapped in plastic wrap.  (I'm one who likes "cold cake" and I will also eat other things in their "cold state", also, so,... I like to store this in the refrigerator.)
*This recipe came from the website of King Arthur Flour.

Wednesday, August 21, 2013

Lemon Poppy Seed Zucchini Quick Loaf *

The one and only ZUCCHINI plant in Pam's garden 
is very, very productive!  This makes me want 
to find all kinds of ways to use what it's putting out!

I LIKE Lemon!
I LIKE Poppy Seed!
I LIKE Zucchini!
I LIKE Bread!
So,... I put 'em all together and have this!!


INGREDIENTS:
  • 4 cups all-purpose flour
  • 1 and 3/4 cups sugar
  • 1 (3.4 ounce) package instant lemon pudding mix
  • 1 and 1/2 teaspoons baking soda
  • 1 teaspoon baking powder
  • 1 teaspoon salt
....
  • 4 large eggs
  • 1 and 1/4 cups milk (I used whole milk)
  • 1 cup canola or vegetable oil (I used "Smart Balance" oil blend)
  • 3 tablespoons lemon juice
  • 1 teaspoon lemon extract
....
  • 2 cups shredded zucchini  (If using larger zucchini, cut lengthwise and scrape out the seeds and fibrous "stuff", then grate.  I did not peel it.)
  • 1/4 cup poppy seeds
  • 1 tablespoon grated lemon peel
DIRECTIONS:
  • Preheat oven to 350-degrees
  • Set oven rack to second-lowest position
  • Grease two 9 x 5-inch loaf pans (I also put a piece of parchment paper in the bottom of each.)
  • In a large bowl combine the flour, sugar, dry pudding mix, baking soda, baking powder and salt.  Set aside.
  • In another bowl, first whisk the eggs; add milk, oil, lemon juice and lemon extract. Whisk together.  
  • Using a wooden spoon or spatula, gently stir the "wet ingredients" into dry ingredients JUST until moistened.  (Like when making muffins, do NOT over mix this batter.)
  • Fold in the grated zucchini, poppy seeds and lemon peel.
  • Bake for 50-55 minutes or until a toothpick or thin wooden skewer inserted near the center comes out clean.  In my oven, I needed to bake these two loves for about 1 hour (or 60 minutes).  
  • Cool for 10 minutes before removing from pans to wire racks to cool completely.
* This recipe comes from the website of Kittencal's Kitchen (a while back, when I sent her an e-mail and asked if I could make some of her recipes and post them in this blog, she wrote back and said "yes".   Thanks, Kitten Cal!
Today, while making this, I thought of Wayne's late Aunt Alma-- 
I think she was 'the' expert when it came to making any
 kind of poppy seed cake and, of course, her 
poppy seed Czech-style Kolache pastries.
                                  M-M-M, goooooood!
Today, before my little helper friend got the word 
"zucchini" down, she said to me, "I've never 
had 'zoonie' bread before!"  
Actually, ...me neither! (LOL!!)

Wednesday, May 8, 2013

Banana "Surprise" Muffins

Win'r-Win'r, Muff'n-IN'r!

I am happy with how these turned out!


They're like a cross between banana bread and 
banana muffins.   IF these were only for me, 
I'd have added a LOT of chopped walnuts!


Above:  I baked some of these in the little 
'mini' cupcake papers.


INGREDIENTS:
  • 1 cup all-purpose flour
  • 1 cup finely ground wheat flour
  • 1 teaspoon baking soda
  • 1 teaspoon baking powder
  • 1/2 cup white granulated sugar
  • 1/2 cup brown sugar (light, or dark)
  • 2 tablespoons milled flax seed (make sure they're 'fresh enough' that they don't have an 'old/rancid' taste).
  • --------------------------
  • 3 ripe bananas, mashed (not to the 'soupy' stage, though)
  • 1 cup mayonnaise (I used Hellmann's brand)
  • 1/2 cup sour cream (I used regular)
  • 1 teaspoon vanilla
  • --------------------------
  • 1/2 cup semi-sweet chocolate chips, OR a Hershey's Kiss-- totally OPTIONAL!
DIRECTIONS:
  1. Preheat oven to 375-degrees.
  2. Grease/spray 12 regular-sized muffin cups, or use paper cupcake liners.  I used two pans-- one was a large-type 6-holer for making LARGE muffins, and the other pan was for regular-sized muffins.  I put paper cupcake liners in both pans. This recipe filled the "six-holer" and just four of the regular-sized muffin wells.
  3. Stir the flour(s), baking soda, baking powder, sugar(s) and the flax seed together until evenly blended.
  4. Add the mashed banana, mayonnaise, sour cream and vanilla to the dry ingredients.  Stir only until well combined.
  5. Pour batter into prepared muffin cups to about 3/4 full (I used my lever-action cookie scoop for this--the big papers took about two scoopsful.)
  6. After the batter was in the liners, you could add some chocolate chips, but,.... I just 'pushed' one regular-sized Hershey's Kiss down into the middle of each, leaving only the very tip of it sticking out.  When the muffins were done, they ended up looking like this on the inside...  the 'chocolate kiss' can be the 'surprise'.
  • Bake on middle rack in a preheated oven until golden brown and the tops spring back when lightly pressed-- for about 20-25 minutes.  BUT!, the four baking in the smaller muffin tins were done in about 15 minutes (I think!).  
  • Because ovens are so 'different', check on their baking progress after the first 15 minutes and even more closely after that.


...it WAS . SO . GOOD with a cold glass of milk!!

xxxxxxxxxxxxxxxxxxxxxxxxx

May 10, 2013... today, I made another batch 
a DOUBLE batch and baked them in 
various sized muffin pans/papers...
Into the freezer, they go......... they keep SO well!!!