Milkmaid's Recipe Box

FOOD, FOOD, FOOD! I'm such a FARMER at heart-- even a CALF knows that so much in life is about the FOOD! (A bit of a "bio" about me can be found way down near the bottom.)

You can find a recipe index entitled "Labels" down along the right side, starting below the picture of the farm. Then, below the "Label" list are pictures of some of my old "standbys"-- click on their picture and it should take you to the recipe.

You will see no advertising on my blog; this means there is no monetary benefit for me having "visitors" or "joiners"-- having said that, if you do wish to JOIN my blog, you can do so by scrolling w-a-y down to near the bottom of the page...

My Visitors

Locations of Site Visitors
Showing posts with label Quick Bread. Show all posts

Wednesday, September 7, 2016

BEST BLUEBERRY MUFFINS*


I am posting this recipe here because 
I do NOT want to lose track of it.


Servings:  12 muffins (This recipe makes 18 smaller muffins if you don't fill the cups as full)
Prep Time:  15 Minutes
Bake Time: 25-30 Minutes (or until toothpick comes out clean).
Total Time: 45 Minutes

INGREDIENTS:
  • 2 cups flour, fluffed up and leveled off.
  • 2 teaspoons baking powder
  • 3/4 teaspoon salt
  • 1 stick (1/2 cup) unsalted butter, softened (right now, I only had salted butter here)
  • 1 cup granulated sugar
  • 2 large eggs
  • 1 and 1/2 teaspoons vanilla extract
  • 1/4 teaspoon almond extract (I usually don't like almond flavoring very much, but I trusted the author of the recipe and followed directions--  ah-h-h-h-h, PERFECT!!!!!!)
  • 1/2 cup milk (I only had whole milk)
  • 2 and 1/4 cups fresh blueberries
  • 2 tablespoons Turbinado sugar (mine was sort of light golden brown, and coarse)
INSTRUCTIONS:
  1. Preheat oven to 375-degrees. (With my oven, I preheated to 360-degrees.)  
  2. Line a 12-cup muffin tin with paper liners.  Spray the pan AND the liners lightly with non-stick cooking spray.
  3. In a medium bowl, whisk together the flour, baking powder and salt.  Set aside.
  4. In the bowl of an electric mixer, beat the softened butter and granulated sugar for about 2 minutes.  
  5. Add the eggs, one at a time, scraping down the sides of the bowl and beating well after each addition.
  6. Beat in the vanilla extract and almond extract.  (It's okay if the batter looks a bit grainy.)
  7. Gradually add the set-aside flour mixture, alternating with the milk, beating on low speed ONLY long enough to just "combine".  
  8. By hand, and with a spatula, gently fold in the blueberries ONLY until evenly distributed.  Again, ... do NOT over mix!
  9. Scoop the batter into the sprayed muffin liners with a cookie scoop if you have one.  This amount of batter will make 12 muffin liners very full.
  10. Next, sprinkle a little Turbinado sugar evenly on the top of the muffin batter before baking.
  11. Bake for "about" 30 minutes OR just until lightly golden and a cake tester or toothpick comes out clean.
  12. Let the muffins cool in the pan for about 10 minutes.  Then, run a knife around the edge of each muffin to carefully loosen it from the pan if needed because, sometimes, the blueberries touching the edges want to stick.   
  13. Transfer the muffins to a rack.  Cool completely.  
  14. Eat ONE and then put the rest outta sight for a while OR they will just keeeeeeep disappearing (I say they're that good!).  
Below:  I use this kind of a container 
w/snap-on clear plastic cover to keep these 
fresh longer.  (This is a photo of "smaller" 
muffins because,when making this batch, 
I did not fill the cups as full.)


*Total credit for this main recipe belongs to: http://www.onceuponachef.com/2014/07/best-ever-blueberry-muffins.html  

Because this recipe was copyrighted, I wrote to get permission to share this recipe here. Yay!,-- this is  what I received back this morning:

On Fri, Aug 12, 2016 at 9:27 AM, JenniferSegal <jennifer@onceuponachef.com> wrote:
"Sure Doris- that would be fine.  Thanks for checking! Best, Jenn."   To that, I say "THANK YOU, Jenn!!!!"

Thursday, December 11, 2014

Banana Blueberry Crumb Muffins*


It's hard to believe we can get to THIS kind of 
"GOODNESS" in just about 25 minutes 
from start to finish!


What a wonderful  "marriage"!   Three very ripe bananas and one cup of fresh blueberries--  oh, how GOOD they end up tasting after meeting up with the other ingredients!!!
Yield:  12 muffins
Prep. time is about 5 minutes
Baking time is 18-20 minutes

INGREDIENTS:
  • 1 and 1/2 cups flour
  • 1 teaspoon baking soda
  • 1 teaspoon baking powder
  • 1/2 teaspoon salt
........
  • 3 ripe bananas, mashed (but not into mush)
  • 1/2 cup white sugar
  • 1 egg, slightly beaten
  • 1/3 cup butter, melted
.......
  • 1 cup fresh blueberries
.......
  • 1/4 cup brown sugar, packed
  • 1 and 1/2 tablespoons flour
  • 1/4 teaspoon ground cinnamon
  • 2  teaspoons butter, at room temperature
DIRECTIONS:
  1. Preheat the oven to 365-degrees
  2. Line one 12-count muffin tin with papers
  3. Ever so lightly, spray liners with non-stick spray.  Set aside.
  4. In a med. bowl, combine the 1 and 1/2 cup amount of flour with the baking soda, baking powder and salt.  Whisk together well and set aside.
  5. In another med. bowl, combine smashed bananas, sugar, slightly beaten egg, and melted butter.  Stir until well blended.
  6. Add the flour mixture to the banana mixture, barely stirring-- stir JUST until all is moistened.
  7. Spoon muffin batter into muffin papers (a cookie scooper works great for this)
  8. Drop the fresh blueberries (equally) on top of the muffin dough in the tins-- I ended up having about six blueberries for each muffin top.
  9. Gently press each of the blueberries down into the dough.  They don't have to be totally covered.  (I do it this way so that my stirring doesn't break the blueberries as they could be IF they had been mixed into the dough.)  Set aside.
  10. In a small bowl, combine brown sugar, 1 and 1/2 tablespoon of flour, and the cinnamon together.
  11. Using a fork, cut in the 2 teaspoons softened butter until evenly mixed.
  12. Sprinkle the brown sugar/butter mixture evenly over the tops of the muffins.
  13. Bake for 18-20 minutes OR until a toothpick inserted into the center comes out clean.
  14. ENJOY!!!!  


*  This recipe was adapted from the recipe I saw on the blog of  http://realhousemoms.com/ in 2013.  I didn't make any huge changes.  How I did change: Lightly sprayed the paper liners, reduced the sugar a bit, introduced the fresh blueberries to the batter in a different way, reduced the total amount of the final crumb topping, and reduced the oven temperature just a little.  

Monday, February 10, 2014

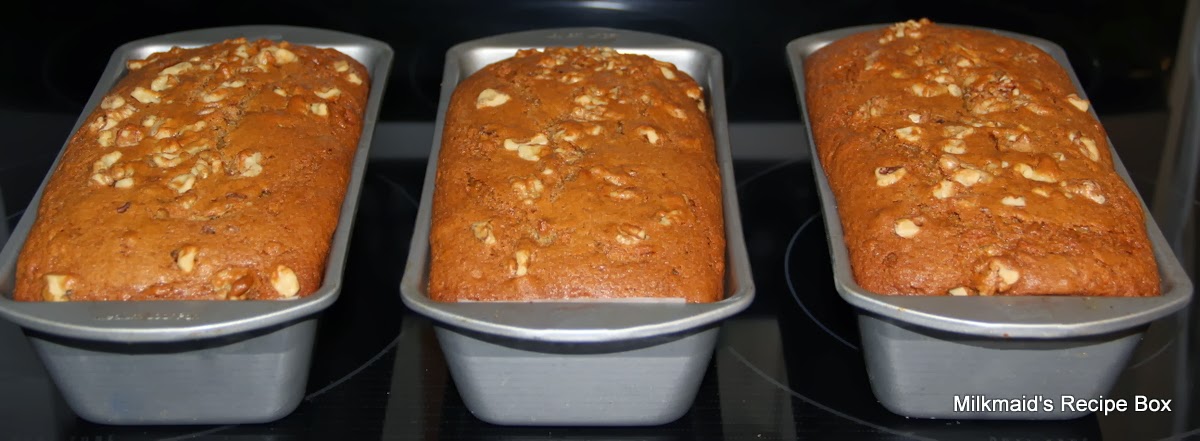
Banana Bread w/Sour Cream*

I will be KEEPING this recipe so I can make more of these!

INGREDIENTS:  

3/4 cup unsalted butter, softened
2 cups white sugar
1 cup dark brown sugar, packed
3 eggs
6 very ripe bananas, smashed (but not into "mush")
2 cups (16 oz.) sour cream (I used Daisy brand)
2 teaspoons vanilla extract
2 level teaspoons ground cinnamon
1/2 teaspoon salt
3 teaspoons baking soda
4 and 1/2 cups all-purpose flour
1 and 1/2 cups chopped walnuts (optional)

DIRECTIONS:  
  • Preheat oven to 300 degrees F (150 degrees C).
  • Grease three of 4¼" x 8½" pans (I measured inside the edges of their top opening).  I like to not only grease/spray the pans, but I also put a long strip of parchment paper down the end, along the bottom and up the other end of each pan and then lightly grease that, too (or very lightly spray it with  "non-stick").  By doing that, it makes loaf-removal less of a "breath-holding" experience.
  1. In a large bowl, cream the softened butter with the 2 cups of white sugar and 1 cup brown sugar. (I used my stand mixer for this.) 
  2. Mix in eggs (one at a time), smashed bananas, sour cream, vanilla and cinnamon.
  3. Mix in salt, baking soda and flour... until evenly blended.
  4. Stir in nuts.
  5. Divide into prepared pans (my pans ended up being filled to almost 1/2" of their top edge).  Before baking, I sprinkled a small amount of chopped walnuts on top of batter and gently pressed them in (just a little).
  6. Bake for 1 hour plus 15 minutes OR until the small/clean/sharp blade of a knife gently inserted in the center comes out clean.  (With the oven I was using, I had to add just a few more minutes.)
  7. Remove from oven, let sit in pans for about 10 minutes.
Remove from pans and lightly butter the tops.Let cool.  Slice.  Enjoy!   (Because these came out of the oven at bedtime, I set them on a layer of dish towels, covered them up with a few more; these were SO READY to CUT and ENJOY by this morning.)


* I changed a few things in the recipe I was sent. I first put a strip of parchment paper into the greased/sprayed pan and then sprayed that.  Then,... the original recipe said to dust the inside of the greased pans with a mixture of sugar and cinnamon, but I opted to NOT do that because I didn't want their outsides to get too dark.  I replaced one cup of white sugar with a cup of dark brown sugar; I used UNsalted butter; and baked the bread in three "larger" pans instead of the four "smaller" ones called for.  Also,...I added 1/2 cups of walnuts, and used some of those for sprinkling on top of the batter before baking.

Monday, August 26, 2013

Double Chocolate Zucchini Bread* (actually, it's more cake-like!)


If you are "into" CHOCOLATE, 
you will probably like this.  

If you are NOT, ...do NOT make this!!!

"Double Chocolate" =  very CHOCOLATE'Y!!

In addition to cocoa, each loaf 
has a whole cup of semi-sweet 
chocolate chips in it! (To make it with "less of strong chocolate", use milk chocolate chips, or leave 'em out altogether.)


INGREDIENTS:


The following ingredients make just ONE of the 8x4-inch loaves.  Double all ingredients to make two as shown above.
1 and 2/3 cups all-purpose flour
1/3 cup Dutch-process cocoa powder (I used Hershey's cocoa)
1 teaspoon salt
1/2 teaspoon baking powder (I use aluminum-free)
1/2 teaspoon baking soda
...
2 large eggs
1/2 cup vegetable oil (I used Smart Balance blend)
1/2 cup light brown sugar, packed
1/3 cup honey (I used honey fresh from our son's beehives)
1 teaspoon vanilla extract
....
2 cups shredded zucchini (If using larger zucchini, cut in half and remove seeds along with its "drier stuff"-- I don't peel it.)
2 cups semi-sweet chocolate chips.  (Use milk chocolate chips IF you would rather have a more mild chocolate flavor!, or leave the chips out altogether.)
 I love nuts! and I would like to have put some in here, ...but not every family member likes them as much as I do!  Besides, my pan was FULL ENOUGH without anything else being added.

DIRECTIONS:
  • Preheat oven to 350-degrees.  Spray an 8x4-inch loaf pan with non-stick spray.  I also cut a long/thin piece of parchment paper that will go down the end, along the bottom, and up the other end.  I spray that, too.   It seems to take the "hope" out of removing the loaf when it's done.
  • In a medium bowl, whisk together the dry ingredients (flour, cocoa, salt, baking powder and baking soda).  Make sure everything is very evenly mixed together. (It's not necessary, but I also ran this dry mixture through a strainer-type sieve to get rid of any small lumps that could be in the cocoa,)  Set aside.
  • In quite a LARGE bowl, whisk together the eggs, oil, brown sugar, honey and vanilla extract.  Once this is mixed together, I like to let this stand for a few minutes so that the liquid (eggs and vanilla) can sort of "melt" the granules of brown sugar.   Maybe five minutes, ...and then I whisk it for a little bit, again.
  • NOW, I dump the bowl of whisked together "dry ingredients" into the large bowl  of the whisked together "wet" ingredients.  Before stirring, I also dump the grated zucchini and the chocolate chips on the top of all.   At this point, I start stirring/blending/folding with a wide spatula or wooden spoon.  I just want to make sure things are blended together-- over-stirring may cause a drier/tougher loaf than I want.
  • Pour the batter into the prepared loaf pan.  When I saw how much batter I had in comparison to the size of the smaller loaf pan, I thought I would surely be in "trouble" because the batter came to 1/2" from the top of the pan.  I was picturing a serious kind of "bake-over" in the oven, but,... it didn't happen.  All was well.  
  • Bake for 65-75 minutes, or until a toothpick (or thin sharp knife) inserted into the center comes out with just a few moist crumbs attached.  Depending on your own oven, and especially if you will be using a DARK kind of loaf pan, you might want to put a baking sheet on the rack that's below the rack you're using-- this may keep the bottom of your loaf from getting too dark before it's done.  My pans were "light colored", so I didn't have to do that.  Some bakers say the baking time may also have to be decreased a little if you are using a dark pan (a glass loaf dish, too?).  You know your oven better than anyone else-- bake accordingly.
  • Allow to cool in the pan for 15 minutes, then turn out onto a cooling rack to cool completely before slicing-- sometimes, it's hard to wait for that!!!  Store leftovers at room temperature, tightly wrapped in plastic wrap.  (I'm one who likes "cold cake" and I will also eat other things in their "cold state", also, so,... I like to store this in the refrigerator.)
*This recipe came from the website of King Arthur Flour.

Wednesday, August 21, 2013

Lemon Poppy Seed Zucchini Quick Loaf *

The one and only ZUCCHINI plant in Pam's garden 
is very, very productive!  This makes me want 
to find all kinds of ways to use what it's putting out!

I LIKE Lemon!
I LIKE Poppy Seed!
I LIKE Zucchini!
I LIKE Bread!
So,... I put 'em all together and have this!!


INGREDIENTS:
  • 4 cups all-purpose flour
  • 1 and 3/4 cups sugar
  • 1 (3.4 ounce) package instant lemon pudding mix
  • 1 and 1/2 teaspoons baking soda
  • 1 teaspoon baking powder
  • 1 teaspoon salt
....
  • 4 large eggs
  • 1 and 1/4 cups milk (I used whole milk)
  • 1 cup canola or vegetable oil (I used "Smart Balance" oil blend)
  • 3 tablespoons lemon juice
  • 1 teaspoon lemon extract
....
  • 2 cups shredded zucchini  (If using larger zucchini, cut lengthwise and scrape out the seeds and fibrous "stuff", then grate.  I did not peel it.)
  • 1/4 cup poppy seeds
  • 1 tablespoon grated lemon peel
DIRECTIONS:
  • Preheat oven to 350-degrees
  • Set oven rack to second-lowest position
  • Grease two 9 x 5-inch loaf pans (I also put a piece of parchment paper in the bottom of each.)
  • In a large bowl combine the flour, sugar, dry pudding mix, baking soda, baking powder and salt.  Set aside.
  • In another bowl, first whisk the eggs; add milk, oil, lemon juice and lemon extract. Whisk together.  
  • Using a wooden spoon or spatula, gently stir the "wet ingredients" into dry ingredients JUST until moistened.  (Like when making muffins, do NOT over mix this batter.)
  • Fold in the grated zucchini, poppy seeds and lemon peel.
  • Bake for 50-55 minutes or until a toothpick or thin wooden skewer inserted near the center comes out clean.  In my oven, I needed to bake these two loves for about 1 hour (or 60 minutes).  
  • Cool for 10 minutes before removing from pans to wire racks to cool completely.
* This recipe comes from the website of Kittencal's Kitchen (a while back, when I sent her an e-mail and asked if I could make some of her recipes and post them in this blog, she wrote back and said "yes".   Thanks, Kitten Cal!
Today, while making this, I thought of Wayne's late Aunt Alma-- 
I think she was 'the' expert when it came to making any
 kind of poppy seed cake and, of course, her 
poppy seed Czech-style Kolache pastries.
                                  M-M-M, goooooood!
Today, before my little helper friend got the word 
"zucchini" down, she said to me, "I've never 
had 'zoonie' bread before!"  
Actually, ...me neither! (LOL!!)

Friday, February 10, 2012

100% Whole Wheat Coconut Oil* Banana Bread


For the two loaves pictured, I doubled the following recipe.

INGREDIENTS:
  • 1 cup sugar (I used 3/4 cup raw honey)
  • 1/3 cup virgin coconut oil* (My note about this is at the bottom)
  • 2 eggs
  • 2 cups mashed ripe bananas (5-6 medium)
  • 1/2 cup water
  • 1 teaspoon baking soda
  • 1/4 teaspoon baking powder
  • 1/2 teaspoon salt (I used a tiny bit less)
  • 1 and 2/3 cups 100% whole wheat flour (Next time, for an experiment, I'm going to try the coconut flour I have on hand.)
  • 1 cup chopped nuts (I used walnut halves)
  • 1 cup shredded coconut (The coconut I used was very 'fine'.)
Here's a photo of the 'shredded' coconut that I used...

DIRECTIONS:
  • Heat oven to 350 degrees. 
  • Grease the bottom only of one 9x5" loaf pan.  (For just in case, I greased pan bottom and also put one sheet of parchment paper in just the bottom of the pan and greased that.)  Set aside.
  • Mix sugar (I used raw honey) and coconut oil until well blended.  With using the honey, I was very surprised to see I had a very 'thick/white mixture' when I first combined the two but I kept the 'beater' going until it was very smooth/well blended-- until the two started to 'behave' and 'get along'!
  • Add mashed bananas and water, mix well.
  • Add baking soda, baking powder and salt.  Mix in evenly/well.
  • Add flour and mix ONLY until all is just moistened.
  • Stir in nuts and coconut.
  • Pour into prepared loaf pan.
  • Bake until toothpick or sharp knife inserted in the middle of loaf comes out clean-- this will be about one hour.
Let it cool for about five minutes; loosen edges with knife and remove from pan to wire rack and cool completely before slicing.

I adapted this recipe from a site with free coconut recipes.  It was originally submitted by Rachel of Costa Rica.

*Through the years, there's been 'hoopla' about coconut oil.  First, it was safe.  Then, it wasn't.  Then, it is, again.   When I did the following 'GOOGLING', this is what came up:

  • Coconut Oil Benefits: 4,820,000 sites
  • Canola Oil Benefits:  1,050,000 sites
  • Olive Oil Benefits:  3,370,000
  • Butter Benefits:  42,700,000
  • Coconut Oil Dangers:  522,000
  • Canola Oil Dangers:  132,000
  • Olive Oil Dangers:  1,410,000
  • Butter Dangers:  5,110,000
The percentage of 'dangers' sites vs. 'benefits' sites of each is probably the most interesting.  Still,... could some of the information on the sites be considered 'suspect' because of the writer having a biased opinion in order to promote another product?  Well,... for what it's worth, you can look/read for yourself.  So,...

Do the 'Google' for yourself, read away and draw your own conclusions-- there is SO MUCH information available on the pros and cons of almost everything.  More information, I think, than any human could ever cover!   I just know that through the years, I faithfully used canola oil and olive oil-- now, as I've aged, I question the smartness of my relying on canola oil as much as I did.
What can I say!?!?!   The two slices were just...................really that good!

Saturday, August 27, 2011

Donna's Zucchini Bread

Last night, while we were away, Pam baked six loaves* of this very tasty zucchini bread.  They were so beautiful, and the house smelled so-o-o-o-o-o-o-o great when we opened the door.

(Photo by me, Doris)

This is the recipe I got from Donna in the 1980's, and it's been my 'go to' ever since.

Preheat oven to 325-degrees and grease two 8"x4" loaf pans.

INGREDIENTS:
3 eggs
3/4 cup oil
2 cups grated zucchini
2 cups sugar
1 teaspoon vanilla
~~~
1 teaspoon salt
1 teaspoon baking soda
1/4 teaspoon baking powder
4 and 1/2 teaspoons cinnamon 
3 cups all-purpose flour
~~~
1/2 cup chopped nuts (optional)
1/2 cup raisins (optional)
~~~~

DIRECTIONS:

Beat eggs, add oil, zucchini, sugar and vanilla.  Mix well.

Add remaining ingredients and mix well.

Divide for two small loaf pans (8"x4").  Bake at 325-degrees for 45-60 minutes or until toothpick comes out clean.  Butter crusts.
......................................................
* Pam made 4 batches of this dough at a time and poured 3 and 1/2 cups of batter into each 9x5-inch loaf pan that were sprayed with Pam (baking variety) that has a combination of oil/flour in it.  By baking in the larger loaf pans, they get done in about an hour (because ovens vary, test with a toothpick stuck into the crack on its top).   She ended up with six large-sized loaves.  Remove from pans, butter the top, and cool on rack before packaging for freezer.

Saturday, July 9, 2011

Banana Bread (with PHOTOS)

I typed up and included this recipe in my regular "Family Chatter" blog during the month of April-- now, I've copy/pasted it into here.   First of all, here are the pictures of how this bread turned out for me-- I was VERY satisfied!!!


Banana Bread: 

I already had/have what I consider some good recipes for making banana bread.  But,... from 'someones?' blog site about baking, I ended up watching a 'you tube' video of an 89 yr. granny making banana bread with her daughter-in-law.  You can find this video by clicking on this link:  http://www.youtube.com/watch?v=kcUy88gELWo  The recipe I found there is what I've typed out below. 

To make this recipe of banana bread, you will need:

6 very ripe bananas with some brown spots on them, but not rotten (LOL!).  Smash/crush these, but not so much that they turn into 'banana soup'... in fact, pieces that are still 1/4 to 1/2" are okay.  Set this aside until it's time to add it.
Start mixing together (you don't need a mixer for this):

2 large eggs, beaten
2/3 cup butter, melted
2 cups sugar  (Ever since the first time I made this recipe, I've used only 1 cup of sugar-- it works!)
2 teaspoons vanilla
2 teaspoons baking soda
2 finger pinches of salt 


Add:  Smashed bananas and stir in until well blended

Add:  3 cups all-purpose flour (stir only long enough to incorporate; do not over mix it)  and 1 cup walnuts, optional (chop them only 'slightly').

 Put this batter into "VERY" greased or buttered pans, paying special attention to the corners of the pan (so the loaves don't act like they are part of the pan after baking).  In fact, I like my daughter Paula's suggestion even better:  Spray the pans with non-stick, cut a piece of parchment paper the size of the pan, put it in there, spray that with the non-stick and........... magic!................. pops out before there's time for any kind of 'wonder if you will' feeling! 


If you are using two large (9" long) loaf pans, bake them about 1 hour at 350-degrees, or until a toothpick or sharp clean/dry knife stuck into the center comes out clean.  I baked mine in three of the smaller (8" long) loaf pans and they were done in about 45-minutes.  Before trying to remove from pan, run a knife around all the edges to loosen them a bit.

Okay, ... done!!!   Wayne was in here as they came from the oven and he wanted a 'sample' right away.  I preferred to first let them cool for a while, but..... he won! (See photo at top.)  He asked me to wrap up a couple of slices for him to take to the woods were John is cutting wood.   I believe this IS a good recipe!  This house smells better than ANY scented candle could accomplish!! 

Saturday, June 11, 2011

Cranberry Nut Bread

In the Fall when it was 'cranberry season', my mother would buy quite a few bags of fresh cranberries and make up a whole bunch of cranberry bread loaves and put them in the freezer to enjoy for quite a while longer.  This is the recipe she used:

This recipe makes ONLY ONE loaf.  (My mother would make six to eight loaves of this recipe at a time.)

INGREDIENTS  and DIRECTIONS:

Combine...
2 cups flour
1/4 teaspoon salt
1 and 1/2 teaspoon baking powder
1/2 teaspoon baking soda
1 cup sugar

Make a 'well' in the above mix and add the following:

1 beaten egg
2 tablespoons melted butter
1/2 cup orange juice
2 tablespoons hot water.

Now, fold in....

1/2 pound cranberries, halved or coarsely ground
1/2 cup whole pecans (optional)
Little bit of grated orange peel  (optional)

Bake in greased 9x5-inch loaf pan at 325-degrees for about 1 hour or until toothpick comes out clean.  Cool in pan for 10 minutes before removing from pan to a wire rack.  Lightly butter the crust.