Milkmaid's Recipe Box

FOOD, FOOD, FOOD! I'm such a FARMER at heart-- even a CALF knows that so much in life is about the FOOD! (A bit of a "bio" about me can be found way down near the bottom.)

You can find a recipe index entitled "Labels" down along the right side, starting below the picture of the farm. Then, below the "Label" list are pictures of some of my old "standbys"-- click on their picture and it should take you to the recipe.

You will see no advertising on my blog; this means there is no monetary benefit for me having "visitors" or "joiners"-- having said that, if you do wish to JOIN my blog, you can do so by scrolling w-a-y down to near the bottom of the page...

My Visitors

Locations of Site Visitors

Monday, February 10, 2014

Banana Bread w/Sour Cream*

I will be KEEPING this recipe so I can make more of these!

INGREDIENTS:  

3/4 cup unsalted butter, softened
2 cups white sugar
1 cup dark brown sugar, packed
3 eggs
6 very ripe bananas, smashed (but not into "mush")
2 cups (16 oz.) sour cream (I used Daisy brand)
2 teaspoons vanilla extract
2 level teaspoons ground cinnamon
1/2 teaspoon salt
3 teaspoons baking soda
4 and 1/2 cups all-purpose flour
1 and 1/2 cups chopped walnuts (optional)

DIRECTIONS:  
  • Preheat oven to 300 degrees F (150 degrees C).
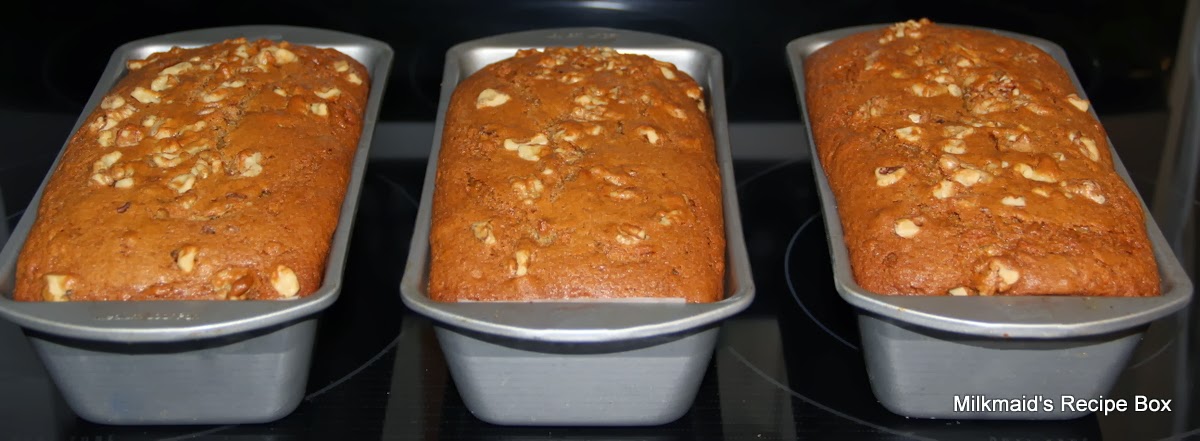
  • Grease three of 4¼" x 8½" pans (I measured inside the edges of their top opening).  I like to not only grease/spray the pans, but I also put a long strip of parchment paper down the end, along the bottom and up the other end of each pan and then lightly grease that, too (or very lightly spray it with  "non-stick").  By doing that, it makes loaf-removal less of a "breath-holding" experience.
  1. In a large bowl, cream the softened butter with the 2 cups of white sugar and 1 cup brown sugar. (I used my stand mixer for this.) 
  2. Mix in eggs (one at a time), smashed bananas, sour cream, vanilla and cinnamon.
  3. Mix in salt, baking soda and flour... until evenly blended.
  4. Stir in nuts.
  5. Divide into prepared pans (my pans ended up being filled to almost 1/2" of their top edge).  Before baking, I sprinkled a small amount of chopped walnuts on top of batter and gently pressed them in (just a little).
  6. Bake for 1 hour plus 15 minutes OR until the small/clean/sharp blade of a knife gently inserted in the center comes out clean.  (With the oven I was using, I had to add just a few more minutes.)
  7. Remove from oven, let sit in pans for about 10 minutes.
Remove from pans and lightly butter the tops.Let cool.  Slice.  Enjoy!   (Because these came out of the oven at bedtime, I set them on a layer of dish towels, covered them up with a few more; these were SO READY to CUT and ENJOY by this morning.)


* I changed a few things in the recipe I was sent. I first put a strip of parchment paper into the greased/sprayed pan and then sprayed that.  Then,... the original recipe said to dust the inside of the greased pans with a mixture of sugar and cinnamon, but I opted to NOT do that because I didn't want their outsides to get too dark.  I replaced one cup of white sugar with a cup of dark brown sugar; I used UNsalted butter; and baked the bread in three "larger" pans instead of the four "smaller" ones called for.  Also,...I added 1/2 cups of walnuts, and used some of those for sprinkling on top of the batter before baking.

Friday, February 7, 2014

Man-Catcher Brownies*


Oh, WAIT!!!-- I do not think these "Man-Catcher Brownies" are going to work for me, nor do I want them to!  Why?  I already have the man I want-- and have for almost 51 years, already!!!  

(Way back when, I didn't have nor need "magic brownies", but,... I, a 100% country girl, was born and raised on a working dairy farm and, even if he wasn't farm-born/raised, he... LIKED farms/farming!!!  So,... I guess,... my country way of life was "all the brownie" I needed!  ☺ )
Below:  Here he is (was) on his 67th birthday--  
looking darned good, I say!
I think the "country life" treated him quite well!
(Under that cap is a full head of "naturally" brown hair.)

Anyhow,... this recipe comes from Amy Westerman*.  She and her husband, Drew, live in Maumelle (just north of Little Rock), Arkansas.  She teaches high school Spanish and spends her free time cooking, baking and playing Roller Derby.  Seriously, ...this IS the name these brownies come with!!  And, there is a story* connected to this recipe, too-- I will put that story at the bottom of this post.  ☺

INGREDIENTS:

30 Kraft caramels, unwrapped
2/3 cup evaporated milk, divided
1 of 15.25-oz. box German chocolate cake mix (For a deeper/darker chocolate brownie, I may try a fudge chocolate cake mix the next time I make these!)
1/2 cup unsalted butter, melted
3/4 cup semi-sweet chocolate chips
1/2 cup chopped pecans OR walnuts

DIRECTIONS:

1.   Heat oven to 350-degrees and line the bottom of a 9x13-inch baking pan with parchment paper.
2.   Melt caramels with only 1/3 cup of the evaporated milk in a small saucepan, stirring mixture occasionally; set sauce aside.
3.   Stir together cake mix, melted butter and the remaining 1/3 cup evaporated milk to form a dough.
4.  Put 1 and 1/3 cups of the dough into the pan by putting dabs of this all over the parchment paper like this and then, with dampened fingers, gently press dough clumps down until entire pan bottom is evenly covered...

Yes, press it down into an even layer like this...

5.  Bake until puffed but not cooked through-- about 7 minutes, like this...
6.   Remove from oven and pour the slightly cooled and set aside "melty" caramel sauce evenly over the top, like this...
7.   Sprinkle chocolate chips over caramel in an even layer...
8.   Top with remaining dough, crumbled into bits and scattered evenly like this...
9.   Sprinkle with chopped nuts...
10. Return to oven.
11. Bake until brownies are puffy and set-- 11-12 minutes more (or, according to how your oven bakes)...
12. Cool completely.
13. Then lift out of pan by holding the edges of the parchment paper... 
Cut into squares...

SERVES 16 

(These are not a thick/puffy kind of brownie.)
Because of the caramel layer in these bars, they will be less sticky and more chewy if kept a little on the "cool" side.

+ + + + + + + +

Below is the word-for-word description and the accompanying story that goes with the above  recipe.  It comes from Pages 82 and 84 of The Ladies Home Journal / February 2014.

* "'This dessert is so good that it's prompted at least two proposals.  I can't promise a wedding, but y'all be careful.  Don't give these to just anyone.'-- Amy Westerman.  (Amy admits, "I make one addition to my mom's famous recipe: extra caramel.")

"When I was 7 my mother Susan, met my future stepfather, Larry.  They had been dating for about a month when she made him a batch of caramel nut brownies-- a recipe she'd come up with herself.  Larry took one bite and blurted, 'Oh my gosh, I love you!'  It was the first time he'd said anything like that, and it was sort of a joke-- but then he followed up with, 'Actually, I really do love you, and I've been wanting to tell you that.'  After they got engaged, Larry renamed the recipe 'Man-Catcher Brownies'.

"Mom taught me how to bake when I was 12, and these brownies were one of the first recipes she shared with me.  'Remember, Amy, whoever eats these will fall in love with you,' she said.  I knew she was teasing, but the brownies still took on magical properties in my mind.  My friends and I would have sleepovers and bake batches of them for boys we had crushes on.  Sometimes we'd be sneaky about it and bring the brownies to the whole class, just so that a particular guy would be sure to eat one.  When one of us had a steady boyfriend, we'd make up a nice little bag for him and tie it with a boy.  Larry was on to our schemes.  'Those man-catcher brownies work, so y'all be careful,' he'd say.  'Don't give 'em to anyone who won't treat you right for the rest of your life.'

"In fact, there was one boyfriend of mine in junior high who wasn't so nice to me, so I dumped him.  The next day he came up to me and said, 'I know we broke up, but my mom really wants the recipe for those brownies.'  I told him, 'Nope.  That's for boyfriends only.'

"I made these brownies for my husband, Drew, early in our relationship.  I'd say the recipe definitely worked its magic, since we've been together for 11 years.  He'll never admit it was the brownies.  But I know better."


+ + + + + +


My husband's comments, with a smile, after he read this story?  "Hm-m-m-m,...tricky women!"

Tuesday, February 4, 2014

CEDRIC's Casserole (cabbage, onions, ground beef, soup)

I . LIKE . RECIPES . WITH . CABBAGE!


Thank  YOU, Cedric!

"Cedric Adams, popular master of ceremonies and columnist, gave us this recipe-- a favorite in his home." 

The above quote comes from Page 276 in the really old Betty Crocker cookbook that I gave to my mother way back in 1961. Here is a picture of the book...
For more information on Cedric Adams:   
..........................................................
CEDRIC's  CASSEROLE 
(I already doubled this recipe 
to make 10-12 servings)

INGREDIENTS:

2 med. onions
3 tbsp. butter (Original recipe would have you use 6!)
1 lb. lean ground beef
1 and 1/2 teaspoons salt (I used coarse Celtic salt)
1/4 teaspoon ground black pepper
1 med. head cabbage, divided
2 of 10 and 1/2 oz. cans condensed tomato soup.

DIRECTIONS:


Sauté 2 medium onions, chopped in 3 tablespoons butter.

Add the following to the sauteed onions, heating through but not browning (and set aside) . . .
     1 lb. lean ground beef
     1 and 1/2 teaspoon salt 
     1/4 teaspoon black pepper

Spread the following in a 4-6 quart baking dish, sprayed with non-stick.  (I used a 5-quart enameled cast iron dutch oven, with cover) . . .


     1/2 of medium-sized head of shredded cabbage--first remove core and discard other tough/hard pieces.  (Our chickens think it's their "Christmas morning" when they get those trimmings!)

Cover with ...
     The meat/onion mixture.  

Top with . . .
     Other half-head of cabbage, shredded

Pour evenly over the top of all . . .
     2 of 10 and 1/2 oz. cans condensed tomato soup.

Bake covered.

Temperature:  350-degrees.
Time:  Bake "about" 1 hour and 20 minutes (or until the cabbage is tender enough to suit you).
Serves:  10-12. 

Since I made this right after the morning school 
bus left today, THIS was MY breakfast!  
I may also have this for dinner (that's what I call 
my noon meal).  I know the others here 
will like it for tonight's supper.

Below:  I LOVED this with a piece 
of toasted Anadama bread that I made 
yesterday (it is posted under "bread").  
But!, since I just posted the bread 
recipe yesterday, you should be able 
to find it right below this posting.


Monday, February 3, 2014

ANADAMA Bread


"This recipe's name comes from a New England fisherman whose lazy wife always served him corn meal mush and molasses.  One day, tired of the same corn meal mush for dinner, he mixed it with flour and yeast and bake it as bread, saying:  'ANNA damn her.' "  

That story behind this recipe's name comes right out of an old (OLD!) Betty Crocker's Picture Cook Book.  I think it's a book from the late 50's and I bought it back in 1961 when I was in Home Economics class and gave it to my mother. Even though she didn't need recipe books to make many delicious things for daddy and us eight kids, she did use this book quite a bit.  

Today, thinking of (and missing) my mother, I looked through this book to find some kind of old recipe to have fun with.  For no special reason, I settled on ANADAMA BREAD.  

Oh, wait!-- it might have been the story that's printed up above that caught my eye and played with my curiosity.  Here is the recipe:

Bring to boil in saucepan:
     1 and 1/2 cups water
     1 teaspoon salt.

To prevent lumping, SLOWLY sprinkle in:
     1/3 cup yellow corn meal
Return to boiling point, stirring constantly.
Pour this into a large mixing bowl.

Stir in:
     1/3 cup molasses
     1 and 1/2 tablespoon shortening
Cool all to lukewarm

Dissolve 1 tablespoon yeast granules in
1/4 cup warm water (not hot, just 100-110 degrees)
with 1/2 teaspoon sugar.

Add the dissolved yeast to the lukewarm corn meal mixture.
Mix well.

*Original recipe asks for a total of from 4 to 4 and 1/4 cups sifted all-purpose Gold Medal flour, but please read what I did at the bottom of the recipe.*

First, mix in one-half of the total flour amount.  Then, add just enough of the remaining flour to handle easily; mix with hand (dough will be sticky).  Turn unto lightly floured board; knead for a few minutes, and let rise until double (about 1 and 1/2 hours).

Punch down, shape into loaf shape, place in greased 9x5x3" loaf pan.  I like to put a strip of parchment paper (lengthwise) in the bottom of my bread pans.  I then lightly spray the strip of paper and the pan sides with something "non-stick"-- but, a light coating of shortening would serve the same purpose.

Brush top with melted butter.  Sprinkle with a very small amount of yellow corn meal and coarse salt.  Let rise in pan until about 1-2 inches above the pan-- it will look like this: 


As shown in the picture below:  I am sure it is not necessary, but I often like to make a couple of slashes/gashes in the risen bread before I bake it to prevent the "stretching" that sometimes happens just above the top edge of the pan while baking.  To successfully make the "slashes/gashes" without causing the dough to "fall", I have to use a knife with a blade that is VERY sharp and coated with cooking oil.  Then, ever so lightly, I make the gashes like this... 

Bake at 375-degrees for 40-45 minutes OR until a rich brown.   (Only because I already have an oven-proof probe thermometer, I often insert it into a loaf of bread after it's been baking for about thirty-minutes, shut the oven door, and it "sounds an alarm" when the internal temperature reaches 200-degrees.)  Ovens vary, so watch how yours does with this-- you may have to adjust the temperature and/or time a bit. If the top of the loaf browns too quickly, put a sheet of aluminum foil over the top until it's done.  Makes 1 loaf.  Coming out of the oven, mine looked like this:
While making this bread, I was wondering if it 
would have a strong molasses taste, but, 
in my opinion,  it is "ever so slight".
ENJOY!!!!

*By using King Arthur's BREAD FLOUR, I didn't 
use much more than a total of 3 and 1/2 cups... 
plus a very small amount for the counter top.